#PreviewBlogs 2019.4 - SOAP and Swagger services for Library projects!
Please provide your valuable feedback about this feature!
Please also check our official documentation for this feature 
New features are awesome! ![]() This is why we wanted to get your thoughts on SOAP and Swagger-based REST services for Library projects, which was introduced in the latest version 2019.4. Consuming web services has never been easier!
This is why we wanted to get your thoughts on SOAP and Swagger-based REST services for Library projects, which was introduced in the latest version 2019.4. Consuming web services has never been easier!
Update on Cloud API authentication
Due to the platform.uipath.com becoming a cloud service, the API changed a bit. Please follow this bit of documentation for an official piece of documentation. You can also go here for a make-shift process that will do all important bits for you:
The only functional difference is that after you go through the steps in the documentation, you will need to use two headers to authenticate instead of one bearer token.
On how to do it in services, please see my post with a screenshot here:
How it works and why would you need it?
Have you ever tried to consume a SOAP or Swagger-based REST service and were struggling to do so in Studio? Long hours of constructing your HTTP Requests are over. With this new, simple and extremely useful addition of Services to Library projects, you are now able to seemingly integrate those in your projects.
Let’s have a closer look how useful it can be!
Let’s build a custom Library and then use it!
Our plan will be simple:
- build custom library in Studio to handle Orchestrator API request
- use our custom library to start an Orchestrator process via API request
Let’s go!
Creating new Library with a New Service
-
Open Studio and start a new Library project
Don’t forget to give it a nice name and description. -
Now, you will see a new option to create a New Service. This can be done either from the Ribbon or by right clicking the Services field in the Project settings:
-
In the new window, type this URL into the File or link field (you can type any URL that points to any service description as long as it is a WSDL or swagger file). We will use the Orchestrator API swagger url:
https://platform.uipath.com:443/swagger/docs/V2Click Load. It will take some time to load our Orchestrator API, but it will be well worth it!

-
When it loads, you will see all available end points of this service. At this point, you can also change the name of the Namespace for your New Service. In our case, it will be OrchestratorAPI:
Now we can click Save to add our New Service. You can immediately see that it was added in the Project pane:

Now, let’s use it to build our workflow!


Building a library activity
Let’s build an activity that will start a new process by taking a few arguments:
- Orchestrator credentials
- Process Name
- Robot Name
Let’s begin!
It is important to think what we are trying to achieve and what will be needed. To perform a successful API call to Orchestrator, we will need to:
- authenticate our session to get a bearer token
- get the robot id for the requested robot name
- get the process id for the requested process name
- start the process
To do so, we will make use of these four Orchestrator API endpoints:
- /api/Account/Authenticate
- /odata/Robots
- /odata/Releases
- /odata/Jobs/UiPath.Server.Configuration.OData.StartJobs
If we were building a bigger project, we could create a separate workflow for each API call to keep things modular by having four library activities. However, for this example we will create one workflow which will contain four sequences for each API call.
At last, let’s go to Studio and make it happen ![]()
-
Let’s first add a new flowchart, rename it to something appropriate and then delete the default one. Your Process pane should look like that:

-
Then, let’s create sequences for every API call we want to make:
-
Just to be sure all will work nicely, let’s also add the namespace of our service to the workflow, like so:
After a click, it will be added to the list:
-
Now, let’s assign all necessary arguments:
We will need these 6 arguments:Argument Direction Argument Type Description in_TenantName IN String Orchestrator tenant name in_Username IN String Orchestrator username in_Password IN String Orchestrator password in_ProcessName IN String Name of the process to be started in_RobotName IN String Name of the robot which should run the process out_Status Out String Returns whether API call was successful It should look like this:
-
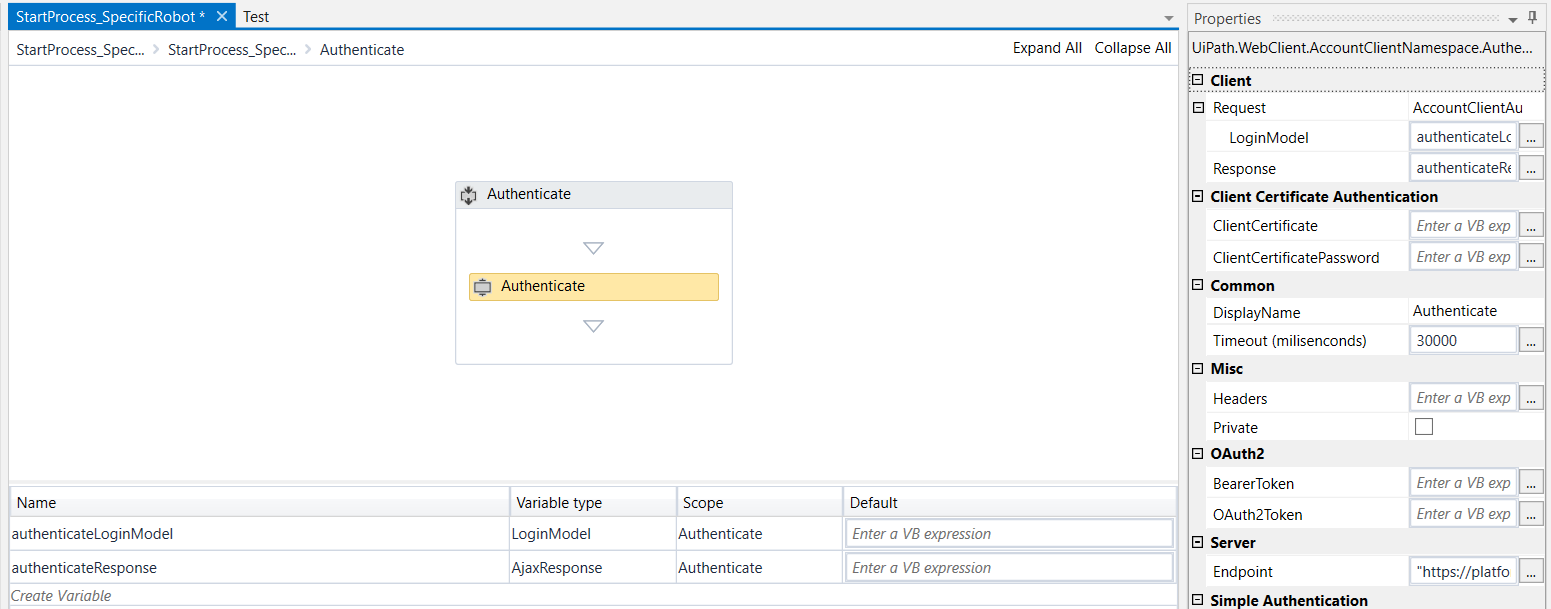
Now, let’s edit the Authenticate sequence first:
We need to add an activity for our API endpoint from the activities list:
Even though the activity looks a bit intimidating, we only need to worry about these two variables and its values:
LoginModel
and
ResponseThe easiest here is to use the CTRL + K shortcut in each field and create a variable of the respective type:
We also need to remember to initialize this new variable like so:
new OrchestratorAPI.LoginModelWith that done, let’s create a sequence to initialize and assign values to the required fields. We can use Swagger for reference:

Here’s how it should look like:
At the end, we will want to assign the bearer token that will be returned by the Authenticate activity to a variable available for other sequences. Let’s call it a bearerToken and set its scope to our flowchart:
Then, let’s assign the output of our Authenticate service activity like so:

The authenticate sequence is now completed Let’s complete our other sequences! -
Let’s continue with the Get Robot ID sequence next:
In this case, it is a lot simpler. Simply drag and drop the GetRobots service activity, and then create the response variable with CTRL+K.
Then, we should add this filter to its properties:
"Name eq '" + in_RobotName + "'"Authenticate the call with our bearerToken:

And create another variable for the flowchart scope that will store our Robot ID. It all should look like that at this point:
-
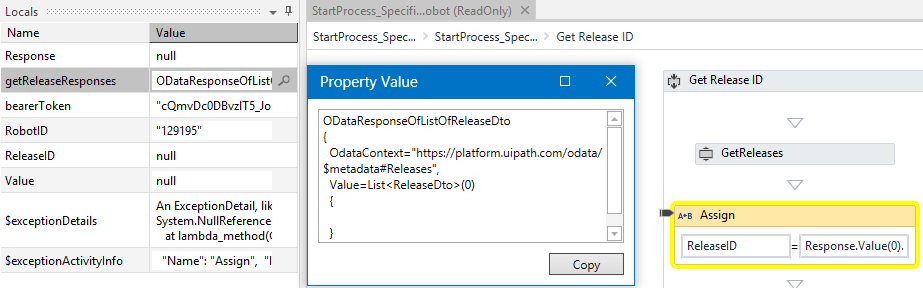
Next sequence, Get Release ID (thus our process name), is really similar to Get Robot ID and should look like that:
The syntax for the filter would look like that here:
"Name eq '" + in_ProcessName + "'" -
Lastly, our last sequence should combine the efforts and launch our process
We will have a bit more work here due to the specifics of that API call. Here’s how most of the flow should look like at the end:
And this is the order to achieve it. Most of it revolves around the swagger definition of this API call:


-
First, we will initialize the object so that we can modify its values:

startJobsStartJobParameters.StartInfo = new OrchestratorAPI.StartProcessDto -
then assign all the values necessary to launch the process:

startJobsStartJobParameters.StartInfo.RobotIds = {CLng(robotID)} startJobsStartJobParameters.StartInfo.ReleaseKey = releaseID startJobsStartJobParameters.StartInfo.Strategy = 1 -
lastly, we will start our job

Don’t forget to initialize your StartJobParameters variable as well:
startJobsStartJobParameters = new OrchestratorAPI.StartJobParameters -
and assign the state of the job as our output variable out_Status:

out_Status = startJobsResponse.Value(0).State.TostringLet’s add one more write line activity and see if it all works!

Aand… RUN! (F5)
As you can see, the process is not pending and will be launched the next time Robot sends a heartbeat to Orchestrator!

Here it is:


Now we can publish our library project and run any job we want by simply providing just a few arguments!
Feel free to go through the entire project yourself and see it in action yourself ![]() :
:
OrchestratorAPIExample.zip (310.0 KB)
That’s it for this #PreviewBlog
For more information, you can also check our documentation of this feature available here.
Please provide your valuable feedback about this feature! Our product team is hungry to build upon the basic functionalities so feed them your ideas
Don’t be shy, click on ![]() below and tell us what you think!
below and tell us what you think!
As always, thank you for reading and happy automating!
 strong text