Strategic view
Attended automation has always been a very specific type of automations that UiPath customers are building. However - building very responsive automations that are also easily maintainable was hard to achieve. Similarly, when using UiPath forms or callouts, you were a bit trapped in the existing development model making thigs like working with multiple forms very hard to achieve. So while automation designers were free to dream on what these could look and feel, RPA developers had a hard time implementing those.
With these new improvements, we are both making the development of attended automations much more approachable for any RPA Developer, as well as enabling more complex use cases - like the contact center ones.
If you have built automations in the past using UiPath Studio (especially attended automations), read on to understand the depth of improvements coming your way.
Overview
We are introducing a revolutionary new way of building Attended Automations, that is based on application and user events and triggers. Basically - when a certain user event happens (ex: user clicked on a button) or an application event (ex: a UI Element appeared), you will have the ability to call a certain XAML file. Unlike traditional, sequence programming you’ll design these automations to be asynchronous, trigger-based.
Form building as well as reacting to user input on certain forms has also been rearchitected in a similar fashion, thus enabling things like working with multiple forms at a time, or working with multiple instances of the same form.
Performance was (and continues to be) greatly improved in these use cases.
Here is a short video overview:
 of developing Attended Automation with UiPath")
UI Automation Triggers
Using the new “Application Event Trigger” activity as the 1st activity of a xaml file, RPA developers can now trigger that workflow when a certain UI event occurs.
For the current job to listen to events (in general), your Main.xaml file needs to include a “Run Local Triggers” activity. Only once this activity started executing, those events will be listened to.
XAMLs that start with such a UIA trigger have a TriggerEventArgs input argument that has a TargetElement property that refers to the UI Element that triggered that xaml.
The list of events a certain UI Element is exposing depends on the target application technology (e.g. java, web, etc) and on the target element itself. For example - a window can appear, and a text element can change its value.
Please note that these triggers cannot stop the propagation of the events in the target app. So if a user’s action will close the app, the app will most probably be closed while the triggered xaml executes.


If you want to be able to stop the propagation of an event based on a users’ action, you’ll have to use the “Click Event Trigger” or the “Keypress Event Trigger” activities, with “Block event” checked. Later on, if you want to replay that event, you can use the “Replay User Event” activity and pass the TriggerEventArgs.Event as the event to be replayed:

Here’s a video showing all of the above:
 of developing UI Automation triggers with UiPath")
UI Automation triggers work fine for windows and java apps, as well as websites.
UI Automation triggers don’t yet work with WPF apps.
Note: With this preview version web triggers are available through a beta version of the UiPath.UIAutomation.Activities package, that is not included in the default dependencies for a new project.
To be able to set triggers on UI Elements in browser:
- Update the
UiPath.UIAutomation.Activitiesdependency to version23.4.0-beta.3581128for your process, from Studio → Manage Packages > Include Prerelease. - Using the “Application Event Trigger” activity you will be able to indicate UI Elements in web pages and monitor different events such as Text changed, Click, Focus gained, Focus lost.
Forms
You can create a new form the same way you create a sequence or a flowchart.

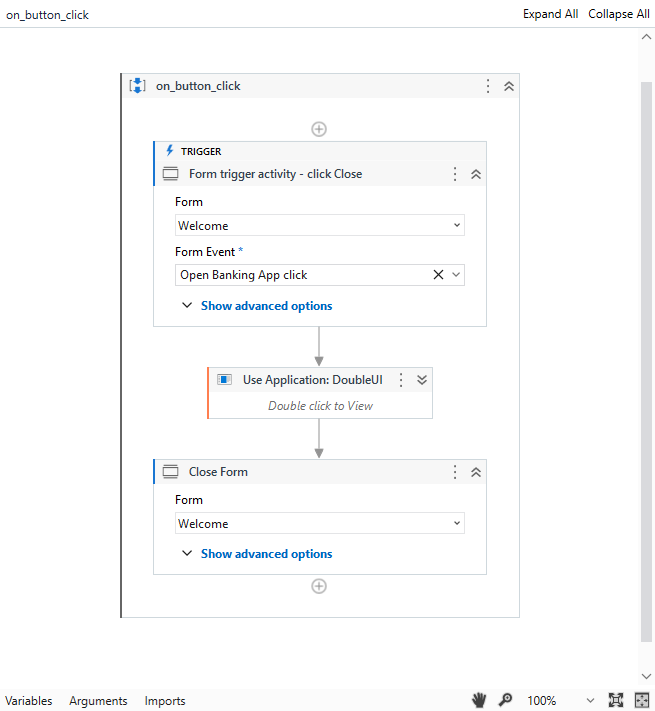
XAML files can be triggered when a form is opened, closed, minimized, etc by creating a triggered xaml that starts with the “Form Event Trigger” activity:

A form can be programmatically opened while passing input arguments, using the “Show Form” activity.
When opening a form, one can choose the action to be blocking (WF execution stops) or not, via a show form’s activity property.
Output arguments for forms are only valid for “blocking” forms, since the non-blocking ones will continue the execution of the current xaml file.
Getting data from a form as well as setting data is possible via activities as well. You should use the “Set Form Values“ / “Get Form Values” activities, and the form elements’ element keys.
A form can be programmatically minimized, restored, moved around or closed. using the “Change Form Properties” activity. In the same way, a form can have a corresponding taskbar entry or not; a form can have margins, or not; a form can be set-up to be “always on top”.
Here is simple walk-through on forms in general:
 of developing UiPath Forms and form triggers with UiPath")
Injecting JavaScript in a form is possible using the “Run Form Script” activity. To understand the DOM/CSS used in a form, you can “right click / open dev tools” a form once it was rendered.
We have the ability to display multiple forms at the same time. Simply use multiple “Show Form” activity with “Continue Workflow Execution“ checked.
If you want to display the same form multiple times, one should use the form’s Instance Name to be able to target a specific form when interacting with it. Similarly, the Instance Name will be passed when a certain form triggers a xaml, so that the RPA Developer knows what instance triggered that event. One example here is when you want to have 1 form per customer, and work on multiple customers at a time. You’d use something that uniquely identifies the customer (like their email) as the Instance Name. Here’s a example:
")
In the near future, callouts will be able to use the same forms views / triggers. The main difference is that callouts will be relative to a specific UI Element.
Custom HTML forms are also fully supported. Here’s a tutorial:
")
Forms triggers
XAML files can be triggered when a form element changes value, or one of the form buttons is clicked.
HTML forms will have an API exposed to enable such interactions. Here’s a tutorial: 8. Working with custom HTML forms with UiPath (in 2023) - YouTube
Triggers, in general
To exit the “Run Local Triggers“ activity, one should use the “Stop Local Triggers” activity in one of the triggers.
We have a way to trigger a xaml file on an interval basis using the “Repeat trigger” activity.
The new triggers can also be used inside a Trigger Scope.
When not used inside a Trigger Scope (when the trigger is the 1st one in a xaml), one can decide the Scheduling Mode (i.e. Concurrent, Sequential, OneTime) at the trigger level. Here’s a video explaining this:

One is able to create a trigger for a global variable that changes values. Here’s a video explaining this:
 of global variable triggers with UiPath")
One is able to filter the activities to see the ones that have to do with triggers.
If one sees performance being impacted by too many triggers, they have a way to enable / disable the active triggers by using activities.
In the future:
- One will able to filter the global variables to see the ones that have attached triggers
- One will be able to create a trigger for a form element right from the form designer in Studio.
- One will be able to filter their xaml files to see which ones are triggered
- One will be able to create a trigger for a UI Element starting from Object Repository
- One will be able to filter objects in Object repository to see the ones that have attached triggers
- One will be able to see the form elements in Object Repository
Using the attended framework template with the new capabilities
You can access a preview version of the attended framework using the new forms and trigger capabilities via the Studio template feed or through the Marketplace page.
To access the template from Studio:
- Access the Templates module from the Home tab
- Select the Marketplace feed from the dropdown menu
- Choose the “Attended Automation Triggers Template” version 1.0.0-alpha
To access the template from the Marketplace:
- Access the following link (Attended Automation Triggers Template - RPA Component | UiPath Marketplace)
- Download the template nuget file
- Move the nuget file into your local template feed (by default it should be in your Documents\UiPath.templates folder)
- Access the Templates module from the Home tab
- Select the Local feed from the dropdown menu
- Choose the “Attended Automation Triggers Template” version 1.0.0-alpha

Build your own project
If you want to play with new projects without using the above template, you can do that by following the steps described here Testing the new triggered attended automation capabilities with Studio 23.2