2020 Fast Track: Community Preview 20.3 Release
As we’re tirelessly preparing for our April FTS release while working comfortably from our home desks, we’re giving you a new sneak peek into the capabilities we’ll soon share with the world. Make good use of the below table of contents, and don’t be shy to post a comment to let us know what you think.
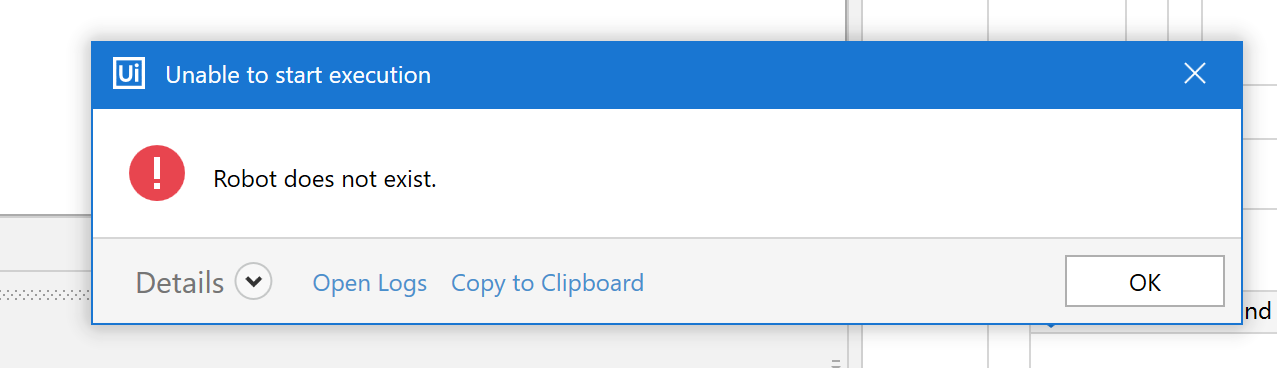
Important. Starting with this version, you will not be able anymore to start a process from Orchestrator on a Robot of type Studio. In order to start processes from Orchestrator, you should use an Unattended Robot. Each Community account has 1 Unattended Robot included.
Quick links
Studio
AutoUpgrade Nuget Downgrades
When a NuGet downgrade occurs, Studio will prompt the user to upgrade his reference. For example, if Project A depends on System 19.10 and also adds a dependency on a Library A which depends on System 20.1 a downgrade occurs. You will be prompted to update your reference of System to 20.1. Choosing Yes will perform the upgrade, choosing No will revert him back to Manage Packages. More details on managing packages here.
Import and Remove Namespaces via Right Click
Whenever you install a new dependency to your project, either a .nupkg file from Manage Packages default feeds, or a custom library that you’ve created, the namespaces can be imported from the Project panel as well. Simply right-click the dependency in the tree, and select Import Namespaces. The namespaces are automatically added to your project, you can check them in the Imports panel. Documented in the Studio guide here.
To remove a namespace, select it and press Delete. Note that namespaces can only be deleted if they aren’t used. For example, you can delete a namespace if the assembly that contains it is no longer referenced by the project. More details here.
New Governance Settings
For more details on Governance, please check our guide here. You can now deploy a policy that controls the value for:
- Create Docked Annotations setting: which you can find under Settings > Design > Activities Design Style.
- Enforce Analyzer before Run setting: which you can find under Settings > Design > Save and Publish.
- Enforce Analyzer before Publish: which you can find under Settings > Design > Save and Publish.
- Enforce Check-In before Publish: which you can find under Settings > Design > Save and Publish.
Expression Editor Search
Just hit CTRL+F inside any Expression Editor window and behold our new search floating panel.
New Workflow Analyzer Rule to detect Blacklisted Packages Usage
ST-USG-014 - Detect Blacklisted Packages Usage. More details here.
Minor Improvements
- Configurable Run Debug Options: there’s a new Studio setting that allows users to configure what is the default action of the Debug/Run ribbon action. You can find it under Settings > Design > Execution.
- Enter activity display name on double click instead of a single click: it was a nuisance when clicking the header by mistake triggered the renaming action.
- Remember Activity Packages Terms and Conditions: if you already agreed to the TCs for a package version, Studio won’t ask again. Studio will also stop askign for agreeing on TCs for UiPath built packages since these are agreed on install.
- Auto-create variable name from the selected text in the expression: if you select the text inside an expression and hit a shortcut for creating an argument or variable, the selected text becomes the name of the variable/argument.
- Var and Arg Shortcuts String Creation Default: shortcuts for creating variables or arguments now default to String instead of GenericValue.
- Copy Paste Search Bar Contextual Menu: we added contextual menus for the search fields inside the panels which support search.
- Soap and Swagger wizard Infobar: inform the user about where the activities were created after a wizard finished.
- Git integration ability to manage remote repositories as well. A new option to Manage Remotes is present in the GIT status bar, which opens up the ‘Manage Remotes’ window . The user can add any remote he/she desires to push changes to, and set is as Default, by right clicking on the repository and using the ‘Set as Default’ option. The Default remote is marked by a bullet and is bolded. Documented here.
- Git support for Windows proxy: Documented in the Managing Projects with GIT documentation page.
- Code Editor-like line formatting and numbering support: Expression Editor line number support, similar to Code editor. The appearance is also inline with Code Editor - detect code and strings and code formatting in general.
StudioX
- You can now name the variable used for accessing the current iteration in all of the “For Each” activities.
- Common actions are automatically logged to the robot logs at run time. The logged information includes: which application or URL is used for automation (including data scraping), and the use of resources (Excel file name, Word file name, and Outlook account name). Also, information about all emails created (Send Email, Reply, and Forward) with the To, CC, and BCC properties is also stored, even if it was saved as a draft.
- When writing to an Excel sheet inside a loop, you can now automatically write to the next row for each iteration by checking the “Autoincrement row” checkbox on the “Write Cell” activity. This works regardless of the type of loop which contains the activity (Repeat, Excel For Each Row, For Each Email, For Each File in Folder).
Email Automation
- You can now create HTML email bodies when sending emails through Outlook. This enables you to insert Excel tables, pictures, use different fonts and colors, among many other formatting capabilities. To send an HTML email, create the body of the email in a Word document, choose the “Document” option for the “Body” property, and select the document you want to use for the email body.
- When processing emails using a “For Each Email Message” activity, you can now choose filters for which mails to be selected. Options include the ability to limit the maximum number of emails you want to process (0 currently means ‘No Limit’), and to filter only Unread emails. You can also filter by BCC, CC, Date, From, and To values using the “Additional Filters” button.
UI Automation
- The UiPath.UIAutomationX activity package was renamed to UiPath.UIAutomation.Next. If you are upgrading an existing project, you’ll need to remove the reference to the old package, and add a reference to the updated package.
- We introduced a new type of selector we call Fuzzy selector, designed to work better in conjunction with anchors.
- A new validation functionality that checks all the configured methods, in all combinations, and gives a score for the current selection.
- We updated the way targets are edited, deleted, and confirmed, by hovering over the selected element and clicking the menu that appears.
- There’s a new Check state activity that can be used to verify that the target application is in the correct state.
- In the selection screen there is a new option for image-based targets & anchors (F3).
- Under the hood, the text search method used for all apps and browsers was revamped.
- The “Use Application/Browser” activity now shows important information about the target application in the designer including the target application or URL.
- When targeting a desktop application, you can now specify arguments to the application. An example of where this is useful if you want to open a specific file in an application (e.g. Adobe Acrobat), you can provide the full file path as an argument.
- The UiPath.UIAutomation.Next package contains multiple breaking changes to activities, that will likely require deleting existing uses of UI Automation activities and adding them again.
UiPath Assistant Agent Desktop
We renamed the Agent Desktop to ![]()
![]()
![]() UiPath Assistant!
UiPath Assistant!
We did this in order to better reflect our vision for this product: a partner for the business users that would help them interact with all the UiPath products.
Stay put for the following release ![]() . UiPath Assistant will bring a lot of surprises
. UiPath Assistant will bring a lot of surprises ![]()
![]()
![]() !
!
Activities
Document Understanding
Here we are with another couple of cool features for you! ![]() The IntelligentOCR package keeps getting more and more robust, offering you more flexibility and ease of use with every incoming release. We constantly listen to your feedback and this month we worked hard to add some highly demanded improvements:
The IntelligentOCR package keeps getting more and more robust, offering you more flexibility and ease of use with every incoming release. We constantly listen to your feedback and this month we worked hard to add some highly demanded improvements:
 The Regex Based Extractor now allows you to process documents using a “visual” algorithm. If you set the UseVisualAlignment flag to True, the activity applies the regular expressions defined by you for data extraction on a visual projection of the document text.
 The Position Based Extractor has been renamed to Form Extractor, for its name to better describe what it is best fit for: processing forms for data extraction.
- The Export Extraction Results activity now allows you to export the Confidence of each extracted data point, if you choose to check the IncludeConfidence flag. Check out the new exported structure by looping through the output dataset’s Tables and writing them (with Include Headers for easier viewing) into a Workbook.
You know us, we will keep adding more and more features, so try these ones out while we’re baking some really nice surprises for you! ![]() Meanwhile, your feedback is invaluable, so do let us know what works / or could work better / or you feel is missing, to help your robots understand documents!
Meanwhile, your feedback is invaluable, so do let us know what works / or could work better / or you feel is missing, to help your robots understand documents! ![]()
![]()
System Activities
Multiple Entry Points
For the InvokeProcess and RunParallelProcces, we added the capability to start a process from a different workflow than Main. You will be able to decide, in the parent process, what will be the XAML that the child process will execute first.

Download File activity 
You can now start a download and have the workflow wait for it to finish before providing you with the file information. It’s not just browsers, you can trigger the download from any application (maybe an SQL client exporting a database dump or whatever else you want). See docs here

IT Automation
UiPath.Azure.Activities package v1.1.0 brings 20+ new activities for Network Interfaces, Network Security Groups, Security Rules, Security Alerts, for deleting a secret in a key vault, and for setting the access tier at the blob level.

In addition, we are happy to announce that many activities related to Blob Containers and Blobs were enhanced so they can work both outside and within an Azure Scope activity . For Blob Containers activities to work outside scope, you must provide a value for StorageAccountKey parameter and for the parameters in Outside Scope Usage category, as below:

The list of activities that can be used outside Azure Scope activity:
- Get Blob Container
- Get Blob Container List
- For Each Blob Container
- Create Blob Container
- Delete Blob Container
- Get Blob
- Get Blob List
- For Each Blob in Container
- Download Blob to File
- Upload Blob from File
- Append to Blob
- Delete Blob
- Set Blob Tier
Cloud Platform Updates
Check out the new face of the UiPath Cloud Platform portal:
Cloud Orchestrator
We have updated the version of Orchestrator Cloud running on our Cloud Platform - Community instances, bringing you the latest changes and bug fixes. The version update is targeted to reach our Cloud Platform - Enterprise instances next week.
For details on everything that was included in this update, please check our Cloud Platform release notes.
Orchestrator Highlights
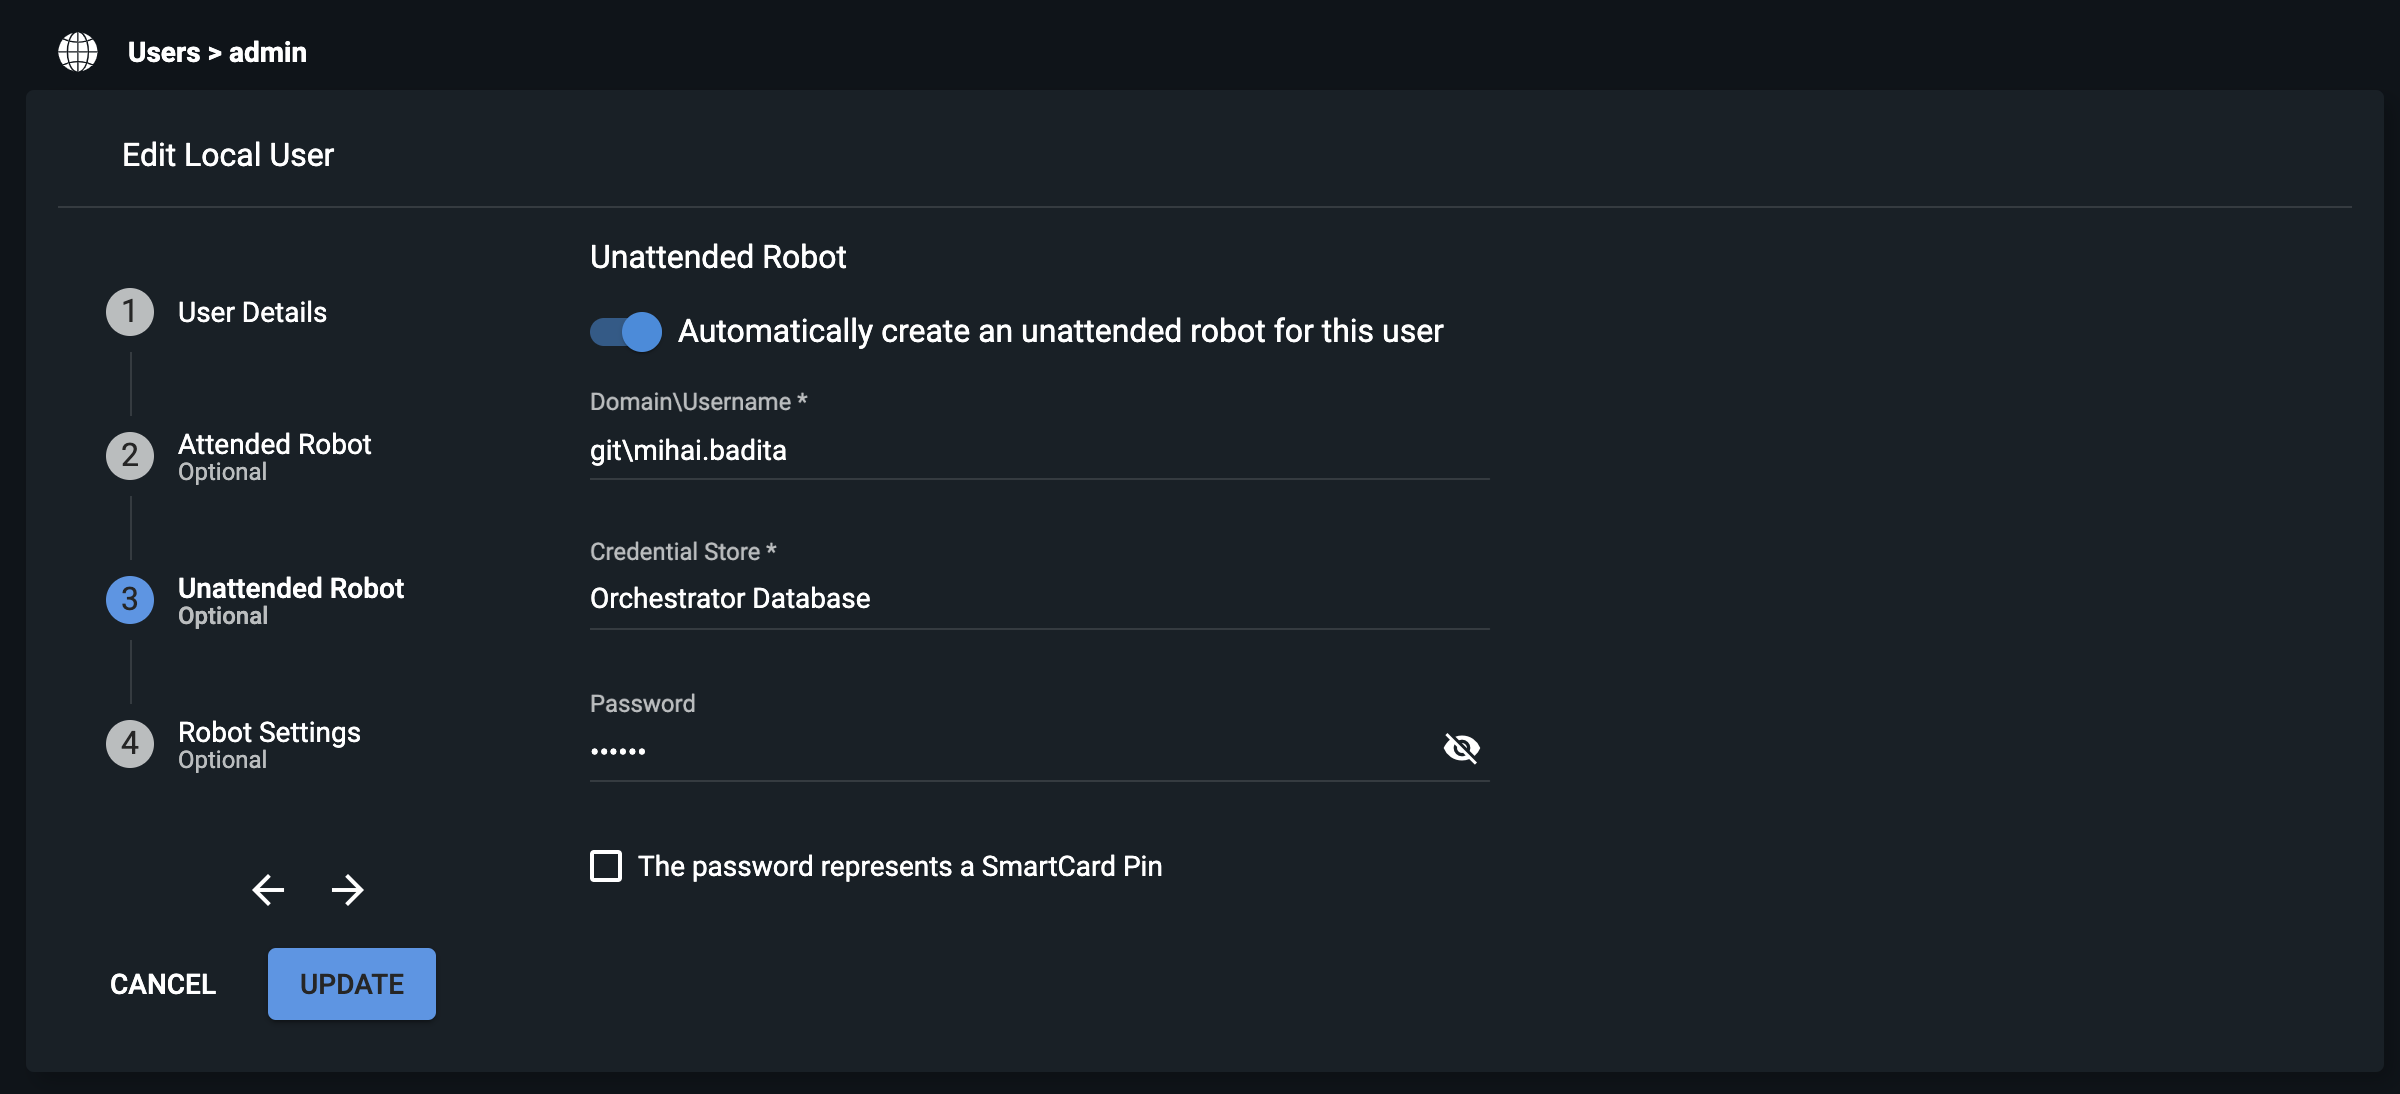
Unattended on Steroids
Machine templates in modern folders remove the necessity of defining a Cartesian product between the sets of users and machines, in the sense that an environment with 5 users and 20 VDIs requires a configuration with 1 machine template and 5 unattended users instead of configuring 100 robots and managing their passwords.
The steps are simple:
- enable modern folders in Orchestrator settings
- edit the user and attach an unattended robot to it
- create a machine template and configure the VDIs or standard machines with its key
- create a modern folder and attach both the user and the machine to it
- deploy the process in the modern folder (no environment needed)
- engage

An important note
Starting with this version, you will no longer be able to start jobs or create triggers from Orchestrator on a Robot of type Studio or StudioX. In order to start processes from Orchestrator, you should use an Unattended Robot. Each Community account has 1 Unattended Robot included.
This is what you need to do to keep your environment trouble-free:
- If you use Studio in production environments via unattended scheduling configured in Orchestrator, use Unattended robots.
- If you use Orchestrator in development environments to schedule and execute jobs on Studio or StudioX robots, use NonProduction robots instead (concerns only Enterprise accounts).