How to automate Jira Software with UiPath
If you are in the dev team and your role is developer, QA, BA, Project Lead, etc., or if you are a client, you must have interacted/used a bug tracking system. We have so many bug trackers and one of the most used tools is Atlassian’s Jira Software. How would it be if you can automate everything you do in Jira right from creating a ticket to the closure of the ticket with proper comments, sounds interesting right? ![]() So, if you want to do all that flawlessly through UiPath this blog is calling you.
So, if you want to do all that flawlessly through UiPath this blog is calling you.
So, what will you learn at the end of reading and following this tutorial?
- Creating project in Jira and generating API tokens
- How to perform the below operations in Jira with UiPath
a. Create/Update/Delete Issue
b. Assign Issue/ Update Priority
c. Download/Upload attachments
d. Add/Delete Comments
These are just a few of the operations that you will be seeing but trust me you can do much more with this.
So, what are we waiting for? Let us start.
Jira Software Setting –
I am assuming that you already have an account and some projects in Jira Software. If not, you can simply go to Jira/Atlassian website and register. After that, you can create a project which will be used during the interaction from UiPath.
To create a project just go to Projects in the menu bar and click on Create Project option

Great, you just created your first project. Now you can quickly create a test issue to which you can interact for a sample, to create an issue just click on Create Issue, fill in the necessary info, and you are done.
![]()
So far for the Jira setup, we are done here, we will come back here when we copy the API token which is needed to connect the Software with UiPath.
I think that was easy right? ![]() It will only take few minutes…
It will only take few minutes…
UiPath Automation –
First thing first, you need to install the Jira Software package in the studio first and for that, you know already, you will have to go to Manage Packages just type Jira select the package click on install then save.

Once done you will be able to see the Jira activities under Application → Integrations → JiraSoftware

Now, the most important thing we will have to create a connection between UiPath and JiraSoftware, and that we will do with UserName and API token from JiraSoftware. Remember you should use Jira Software Application Scope as your parent activity and inside this scope, only other related activities should be used, this will work as a container for other child activities which are nothing but you basic operations you do on issues.

Get API token from Jira -
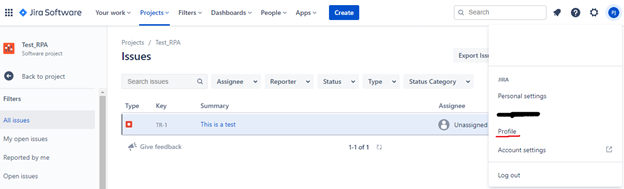
To get the API token from Jira Software, in the application on the right-hand top click on your username initials, it will open a pop-up menu, in the menu click on the profile
It will open your basic profile page, there click on the “Manage Your Account” button

This will open a new page, there on the left-hand panel click on Security

Then click on Create and Manage API Tokens

Click on Create API token button and the create the token and save it somewhere because you will not be able to see it again anywhere if you don’t have a copy

This is it. ![]()
Connect Jira Software Application Scope –
Click on Jira Application Scope Software go to properties and fill API Token, Server Url(Copy Jira URL till the .com) and UserName you are using that is it you are now connected to Jira Software through UiPath and you are ready to perform operations now.

Can’t wait to perform operations now, right? Here you go then ![]()
- Create/Update/Delete Issue
Create Issue – you can use an activity like below, Issue Type you can provide like Bug, Epic, Task, etc.

Once you run this activity, see your Jira application, it should create a new issue –

Update Issue –
For updating an issue, you will have to use update issue activity and pass issue ID which is available in Jira and then you can update multiple fields in a single go.

Delete Issue –
For deleting an issue you can simply pass the Issue ID in Delete Issue activity nothing else is required.
- Assign Issue and Update Priority
To update the priority, you just have to provide IssueID and Priority like Low, Medium, High etc.
Assign Issue
To assign an issue you will have to provide an account ID and Issue ID
You can use Execute method and pass the above information.
Issue ID you can get from the website, Account ID is nothing, but it is unique across all the Atlassian products, so to find it you can go to the profile page when you are on the profile page and click people.
![]()
When you click on someone’s profile at that time from the URL you will be able to find the account ID.
https://yourinstanceofJira.atlassian.net/jira/people/”This would be account ID”
If you do not get Assignee account ID, you can use find users where you can search from Name or email and then get the account id

Update Priority –
Just like we updated the summary, here also use get the issue and update the priority.
- Download/Upload Attachments
Upload Attachment –
You can simply provide the issue id and path of the file you want to attach, that is it

Download Attachments –
Use get issue attachments activity, by just providing the issue id it will return an array of attachments which of type UiPath.JiraSoftware.Models.Attachment then you can iterate on this array variable and download all the attachments.

- Add/Delete comments
Add a comment- For adding a comment you just have to provide Issue ID and your comment as a string.
Delete comment – For deleting a comment you should provide Issue ID and Comment as well. You can use get comments which will return you all the comments of that issue and then you can delete the comment you want.

You can also create filters, projects, get data from dashboards, create/delete issue links, and many more things you can play with, so go ahead and try everything.
So, what do you think guys, it is quite simple, right? It is indeed simple. I have done many projects where we are closing a huge number of tickets in minutes with proper commenting, another use case is we are downloading attachments like an excel file then performing some operations on the data and attaching the updated file. You can also create custom reports by tweaking the data from given activities. It is very useful for developers, clients everyone. So, give it a try, and if at any point you have any questions you can connect with me and I will help you for sure. ![]()
This is it, for now, will come back with more content.
Happy Automation! ![]()
-Prankur


