This is part 2 of a two part tutorial where I demonstrate how to setup a basic UiPath CICD pipeline with Jenkins. In this part, I have included tests to the CICD setup. Before you get started with this part, I strongly recommend that you go through part 1 in detail.
This pipeline tracks a Github repository for changes and as soon as a new version of code is committed, it runs tests on it. If the tests are successful, it pushes a new build and to the UiPath orchestrator in an automated fashion.
You can preview this implementation in the following video: UiPath, Jenkins CICD Pipeline - Part 2 - YouTube

Once again, my thanks to Satish Prasad, the creator of RPABotsWorld.com. His post helped me set this up. I have linked his article in the references section as well.
What you’ll need:
- Admin rights to an orchestrator instance (UiPath Community or Enterprise Edition)
- UiPath Studio Pro + Testing license
- Jenkins installed on your Windows PC
- A Github account and UiPath integrated with it
High level steps:
- Publish Test Set to Orchestrator
- Setup Jenkins Pipeline
- Fail Tests
In each stage I mention the pitfalls that you have to watch out for.
1. Publish Test Set to Orchestrator
- Create tests cases from your UiPath process to the orchestrator. You can clone the process I have used in the preview at GitHub - descriptify/AnnounceFavouriteSinger where I have 1 workflow file (Main) and 1 test case (Test_FavouriteSinger)

Pitfalls:
-
The UiPath.Testing.Activities package must be included as a part of the project
-
The name of the Git repository and the process name should be consistent - this will be reflected in the package published to the orchestrator. Else, the pipeline’s behaviour can be somewhat buggy
-
Publish test cases to the orchestrator
Hit the Publish Test Cases button in Design → Publish tab of UiPath Studio Pro.

These tests should now appear as tests cases in your orchestrator:

Select the relevant test cases and package them into a test set:

Provide the test set an appropriate name, select an environment and push the create button.

Update the name of the test set in the Jenkinsfile (Text for the Jenkinsfile included below) under the ‘Perform Tests’ stage:

2. Setup Jenkins Pipeline
We are now ready to create our Jenkins pipeline. Navigate to Jenkins → New Item. Enter a suitable name, select Multibranch Pipeline and click OK.

In the Branch Sources tab, select Add Source → Github:

In the Repository HTTPS URL field, enter the URL to your Github repository and click Save.

That is pretty much it… If everything is setup perfectly, Jenkins should show you the following screen with the status as “Finished: SUCCESS.”

Jenkins should have replicated the structure of your Github repository. Within the main/ master branch, you should see that the pipeline has successfully created a build:

And this build should reflect as a process and a test process in your orchestrator instance too:

Pitfall: Ensure that you have a testing robot available before the pipeline starts. You can check this under Folder → Robots in orchestrator.

3. Fail Tests
Mess around with your UiPath project to cause tests to fail and publish to the orchestrator. If your pipeline is connected to Github properly (refer to this step in Part1), the update to the Git repository automatically triggers a new build of the Jenkins pipline.

This time, however, the tests fail (indicated by the yellow colour) and the ‘Build Process’, ‘Deploy Process’ stages of the pipeline aren’t executed.
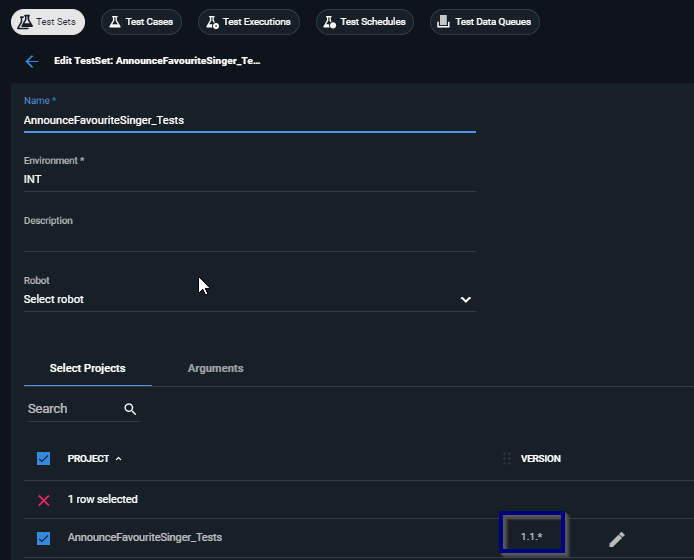
Pitfall: I have encountered problems with test case versioning within the UiPath Orchestrator. At times, the orchestrator’s test set doesn’t automatically run the most recent version of the tests. I then have to change the version manually by navigating to Test Set → Edit → Version.
Next Steps
Alright! So you have gotten this far. Where can you go from here? I suggest you explore the following topics
- Try replicating this pipeline for a library with tests
- Try deploying this code to two different orchestrator instances (INT and PROD for e.g.)
- Break the code within the Jenkinsfile to see how it works
- Use the UiPath plugin to generate additional code to add to the Jenkinsfile
References:
- Preview this in action: UiPath, Jenkins CICD Pipeline - Part 1 - YouTube
- RPA Bots World - Implementing CI CD in UiPath using Jenkins plugin
- UiPath Jenkins plugin documentation
Jenkinsfile text
pipeline {
	    agent any


	        // Environment Variables
	        environment {
	        MAJOR = '1'
	        MINOR = '1'
	        //Orchestrator Services
	        UIPATH_ORCH_URL = "https://cloud.uipath.com/"
	        UIPATH_ORCH_LOGICAL_NAME = "anupaminc"
	        UIPATH_ORCH_TENANT_NAME = "Descriptify"
	        UIPATH_ORCH_FOLDER_NAME = "Default"
	    }


	    stages {


	        // Printing Basic Information
	        stage('Preparing'){
	            steps {
	                echo "Jenkins Home ${env.JENKINS_HOME}"
	                echo "Jenkins URL ${env.JENKINS_URL}"
	                echo "Jenkins JOB Number ${env.BUILD_NUMBER}"
	                echo "Jenkins JOB Name ${env.JOB_NAME}"
	                echo "GitHub BranchName ${env.BRANCH_NAME}"
	                checkout scm


	            }
	        }


	         // Building Tests
	        stage('Build Tests') {
	            steps {
	                echo "Building package with ${WORKSPACE}"
	                UiPathPack (
	                      outputPath: "Output\\Tests\${env.BUILD_NUMBER}",
						  outputType: 'Tests',
	                      projectJsonPath: "project.json",
	                      version: [$class: 'ManualVersionEntry', version: "${MAJOR}.${MINOR}.${env.BUILD_NUMBER}"],
	                      useOrchestrator: false,
						  traceLevel: 'None'
						)
	            }
	        }

	         // Deploy Stages
	        stage('Deploy Tests') {
	            steps {
	                echo "Deploying ${BRANCH_NAME} to orchestrator"
	                UiPathDeploy (
	                packagePath: "Output\\Tests\${env.BUILD_NUMBER}",
	                orchestratorAddress: "${UIPATH_ORCH_URL}",
	                orchestratorTenant: "${UIPATH_ORCH_TENANT_NAME}",
	                folderName: "${UIPATH_ORCH_FOLDER_NAME}",
	                environments: 'INT',
	                //credentials: [$class: 'UserPassAuthenticationEntry', credentialsId: 'APIUserKey']
	                credentials: Token(accountName: "${UIPATH_ORCH_LOGICAL_NAME}", credentialsId: 'APIUserKey'),
					traceLevel: 'None',
					entryPointPaths: 'Main.xaml'


					)
	            }

			}


	         // Test Stages
	        stage('Perform Tests') {
	            steps {
	               echo 'Testing the workflow...'
					UiPathTest (
					  testTarget: [$class: 'TestSetEntry', testSet: "AnnounceFavouriteSinger_Tests"],
					  orchestratorAddress: "${UIPATH_ORCH_URL}",
					  orchestratorTenant: "${UIPATH_ORCH_TENANT_NAME}",
					  folderName: "${UIPATH_ORCH_FOLDER_NAME}",
					  timeout: 10000,
					  traceLevel: 'None',
					  testResultsOutputPath: "result.xml",
					  //credentials: [$class: 'UserPassAuthenticationEntry', credentialsId: "credentialsId"]
					  credentials: Token(accountName: "${UIPATH_ORCH_LOGICAL_NAME}", credentialsId: 'APIUserKey'),
					  parametersFilePath: ''
					)
	            }
			}

	         // Building Package
	        stage('Build Process') {
				when {
					expression {
						currentBuild.result == null || currentBuild.result == 'SUCCESS'
						}
				}
				steps {
					echo "Building package with ${WORKSPACE}"
					UiPathPack (
						  outputPath: "Output\\${env.BUILD_NUMBER}",
						  projectJsonPath: "project.json",
						  version: [$class: 'ManualVersionEntry', version: "${MAJOR}.${MINOR}.${env.BUILD_NUMBER}"],
						  useOrchestrator: false,
						  traceLevel: 'None'
						)
					}
	        }

	         // Deploy to Production Step
	        stage('Deploy Process') {
				when {
					expression {
						currentBuild.result == null || currentBuild.result == 'SUCCESS'
						}
				}
				steps {
	                echo 'Deploying process to orchestrator...'
	                UiPathDeploy (
	                packagePath: "Output\\${env.BUILD_NUMBER}",
	                orchestratorAddress: "${UIPATH_ORCH_URL}",
	                orchestratorTenant: "${UIPATH_ORCH_TENANT_NAME}",
	                folderName: "${UIPATH_ORCH_FOLDER_NAME}",
	                environments: 'INT',
	                //credentials: [$class: 'UserPassAuthenticationEntry', credentialsId: 'APIUserKey']
	                credentials: Token(accountName: "${UIPATH_ORCH_LOGICAL_NAME}", credentialsId: 'APIUserKey'),
					traceLevel: 'None',
					entryPointPaths: 'Main.xaml'
					)
				}
			}

	    }


	    // Options
	    options {
	        // Timeout for pipeline
	        timeout(time:80, unit:'MINUTES')
	        skipDefaultCheckout()
	    }


	    //
	    post {
	        success {
	            echo 'Deployment has been completed!'
	        }
	        failure {
	          echo "FAILED: Job '${env.JOB_NAME} [${env.BUILD_NUMBER}]' (${env.JOB_DISPLAY_URL})"
	        }
	        always {
	            /* Clean workspace if success */
	            cleanWs()
	        }
	    }

	}