Coded Automations & Test Suite
This topic goes in-depth about the improvements in Robot & Assistant. To read about other products, please navigate to the main topic here.
Coded Automation
Overview
Low-code and no-code has emerged as a mainstream approach to building automations for both testing and business processes (RPA). These capabilities have allowed a new generation of developers to emerge and has effectively democratized development to less technical practitioners. However, there are many testers and RPA developers who are more technical and find low-code automations difficult to comprehend, less flexible, and harder to maintain.
For developers who prefer code, we are introducing Coded Automations in UiPath Studio.
Coded Automations will allow developers to:
- Create reusable coded workflows or coded test cases instead of low-code activities
- Simplify developer collaboration on more complex automations
- Accelerate automation migrations from legacy test and RPA providers
Why use Coded Automations instead of low-code?
Coded Automations were designed to enable anyone who is familiar with coding or scripting to experience higher productivity, better complexity management, increased collaboration & reviewability, improved readability, and higher performance, all while experiencing a reduced learning curve due to working in a familiar environment.
According to our survey, ~40% of automation developers rate themselves as having programming skills, while another ~25% have experience with scripting (usually in Excel).
When would you use Coded Automations?
Coded Automation can be applied to any automation scenario - the following activitiy packages are supported:
- UiPath.System.Activities
- UiPath.Testing.Activities
- UiPath.UiAutomation.Activities
Using Coded Automation instead of low-code workflows can be specifically useful…
- If you are an experienced automation developer
- If you are familiar with Selenium and other scripting frameworks and have used them in the past
- If you want to automate complex scenarios that require custom data structures and lots of logic
- If you want to automate performance-critical scenarios that require lots of parallel computation
Note: A Studio project can include both coded automations as well as low-code workflows and it is possible to invoke coded workflows from low-code workflows and vice versa. This way we allow heterogeneous teams consisting of experienced automation developers as well as business-oriented citizen-developers to colloaborate on a single automation project.
How to Get Started
After creating a new Modern or Portable project (both VB and C# are supported as workflow expression languages) you will have the possibility to create 3 new types of file:
- Coded Workflows are the equivalent of Sequences that are also entry points (e.g. Main.xaml in a new empty process project). Note that they can be set as a Main entry point as well. They can be invoked just like any XAML file, using the Invoke Workflow File activity.
- Coded Test Cases are the equivalent of Test Cases.
- Code Source Files represent files containing source code. They are slightly like non-entry point XAML files, e.g. utility files or XAMLs implementing part of the business logic. Code in source code files can also be called in expressions inside XAML files directly, as well as used in order to define more specific types for variables or arguments.

When creating a coded workflow file, a new file will be created with the ending .cs (C# class file). This class is inherited from the base class CodedWorkflow and includes a method that is tagged with an attribute (Coded Workflow vs Coded Test Case) - this method represents the entry point of your automation.
Here you can now use all supported activities, as well as the general feature set and objects .NET has to offer.
The designer canvas acts as your coding IDE and offers you comprehensive capabilities such as syntax highlighting, refactoring and debugging.

During debugging you can leverage the locals/watch panel and even use the immediate window in order to evaluate expressions.
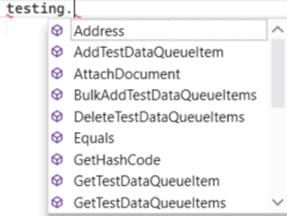
The 3 supported activity packs can be directly accessed by object instances called system, testing and uiAutomation.


The easiest way to get started with coded workflows and UI automation is to pre-record your selectors with Object Repository – in this case you can easily reference them in your automation.
Useful Links
- Feedback? Use Studio’s feedback feature or join our Insider Program (select ‘Coded Automation’).
- Coded Automations Samples Repository
- Coded Automations Introduction
- Getting Started with Coded Automations
- Tutorials
- Tutorial video from one of our MVPs, Thomas Janssen
Test Suite (Studio)
Coded Test Cases
With the new Coded Automations feature, developers can now build test automations directly in code.
Try it out by creating new coded test cases from Studio, which support all the same features as standard test cases, such as UI Automation, object repository, test data, execution templates, Test Explorer integration, Test Manager integration and execution from Orchestrator (any Orchestrator version that supports modern packages also supports executing coded test cases).
To make business logic re-use even easier, we also support defining base coded test case classes. Just create a new Code Source File and derive from CodedWorkflow.
In order to give you even more re-usability, you can also choose to override the Before and After methods as in the above screenshot instead of using an execution template.
A sample of cross-browser tests written in coded test cases is available here.
Coded Automation
After releasing Coded Automation in a public preview in 2023.6, we have seen a lot of interest from our community. Based on your feedback we have been able to fix a number of bugs and introduced some new capabilities.
Access Object Repository Selectors via dot-syntax
So far, in order to use selectors within your coded automation, you had to provide the selectors name as a string. While this approach makes it very easy to get started, it is prone to spelling errors and changes within your repository. This is why we additionally added the possibility to access selectors directly as objects.
Indicate Errors
So far, syntax errors were recognized and the corresponding chars underlined red.
However, in case your document is very long, it was very hard to spot those problems easily. In order to increase visibility for syntax errors, we added a visual indication at the right end of your editor window. This should help you quickly identify problems and fix them.

What is more, on ‘Analyze Project’ we are listing code related problems directly in the Error List panel, including the affected line number. By clicking on the problem, the affected code line will be focussed within your editor automatically.
Convert to Test Case/Workflow
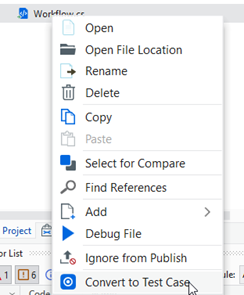
Like low-code automations, you now can convert them from a workflow to a test case or vice versa with a click of a button.

Show Code Documentation on F1
Do you need some more info on a certain class or method? No problem, just select the class/method in your designer and hit F1 on your keyboard – this will automatically open up the corresponding help documentation.
Take Screenshot
The capability to take screenshots via UIAutomation that has been missing so far for coded automation. We received multiple feature requests for it which is why we added it within the latest package.

Set as/Ignore from Publish
Like for low-code Test Cases, you can now decide if you want to include certain Test Cases that might still be in work from actually publishing them to Orchestrator.

Editor Settings for Coded Automation
Coded Automation empowers experienced developers to elevate their productivity, enabling the creation of more robust automations. Recognizing that each developer has unique preferences, we’re introducing Editor Settings for Coded Automation. With these settings, you can customize your development environment to match your personal preferences, enhancing productivity to new heights.
Here is how it works:
Within the settings page of Studio, you now can access a new settings section called ‘Code Editor’.
Here you can configure your code editor experience to match your preferences.
Error List Panel improvements for Coded Automation
So far, Errors discovered on invoking ‘Analyze Project’ were visualized in the Error List Panel, however when you did not pin the panel to your default view, it was not easy to find it right away.
- The Error List Panel now will be focused when ‘Analyze Project’ or Build/Compile was invoked.
- The error list details now include the line number within the document affected
Create Test Cases for your Coded Automations
Coded Automations can be comprehensive and complex – to make sure your code works as expected, you should test it thoroughly.
We now offer the possibility of creating coded test cases for your workflows, irrespective of whether they are coded workflows or standard ones.

When used, a coded test case will be generated, which invokes your workflow under test.
Find all Files option for Coded Automation
Refactoring code over multiple files can be cumbersome if you have to find and replace objects/names manually.
This is why we have introduced a powerful Find/Replace option for Coded Automation.
Here are some of its features:
- Find strings over your entire project
- Open them in dedicated find panel
- Replace them one-by-one or all at once
To open the find dialog simply use Ctrl+Shift+F within a code editor.


