I’m in the “Automation Developer Associate” journey, currently learning “UI Automation Descriptors in Studio”. In section “Fine-Tuning Descriptor”, I am required to type into the “Find” and “Replace” fields in the Find&Replace window in Notepad. However, UiPath Studio fails to recognize the Find&Replace window.
Yes, Window Attach mode is set to Application Instances, and yes, I have tried all 3 UI Frameworks: Default, AA, and UIA. I ended up using Image selection, but it functions poorly as soon as I resize the Notepad window.
Please help! Thank you in advance for your kind support.
@jose.ordonez1 The drawn arrow on the attachment is where my mouse is (it is not captured by the screenshot)
I can’t select any UI elements from the Find & Replace window or the window itself!
Hi sushant.paudel,
Attached below you can find the project with the changes that you need. Please check the workflow and analize it how it is working. You need to read about wildcard into the selectors. The problem that you have with your workflow is associated with the application target because you are using a Keyboard shorcuts activity to open the Replace window. At this point when you need to type the Find what and Replace with values (Into the new windows) you are targeting to another windows and finally the automation fail.
NOTE: Please check all the selector for everyone of the acvitivities used into the workflow. Demo.zip (7.9 KB)
Thank you for all your help.
Although I am still not able to execute such a fairly simple task, I figured out that it’s the version of UI path as well as the notepad that’s causing issue. My org doesn’t allow automatic updates of apps. I will have to wait for our software admin to update both the apps to reasonable versions.
I’m running in to the same issue. The Windows 11 version of Notepad doesn’t have target and anchor elements for Find and Replace. This training needs to be updated for the new version of Notepad please.
When you’re selecting the UI element on the target application (Selection Options window), you can press F4 to cycle between 3 different UI Framework, and UIA is one of them.
However, I have tried that as well, and it doesn’t work for me.
OK, found how to change the UI Framework (THANK YOU!), but yeah, it didn’t work for me in selecting the Find and Replace fields in Windows 11 Notepad, either.
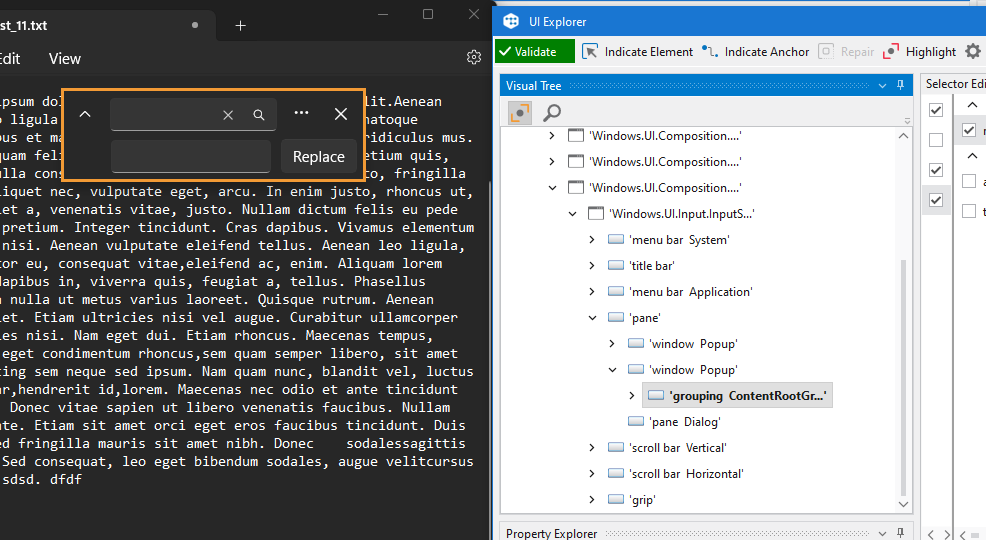
I am adding further details for anyone who’s trying to troubleshoot this issue in the future. Please see the attached screenshot.
I was able to pinpoint the exact UI element through the visual tree which is the node: ‘editable text Find’ and selecting the node highlights the Find box in Notepad which is visible beneath the UI Explorer window.
I right clicked on ‘editable text Find’ node in the visual tree and set it as the target. But when I save the UI Explorer window, I get the error “Target element not found”.
I also have 'editable text Find’s xml: , which I have manually highlighted. But, I don’t know yet where I can plug this information in the properties panel of Studio. Hopefully, as I progress through the training modules, I will learn how to manually indicate selector’s XML.
I appreciate your help in advance if anyone can guide me how to use this information.
I found a way to handle this issue as I continued the training in UiPath academy. The specific information is in the the demo video “Managing difficult situation: Visual Tree Hierarchy and Find Children” in the Chapter “Selectors in Studio Deep Dive”. Using the Visual Tree Hierarchy method is efficient in this case.
If you’re wanting to get a way to do it without going through the video, here is a general way of how I did it:
In your “Type Into” activity for the “Find” box, just indicate whatever is recognized, it doesn’t matter. Then, just select the Strict selector, and deselect the Fuzzy and Image selectors. Click the “Ui Explorer” icon for the strict selector.
Here is when you’ll have to do a little hunting to find the correct window. I have attached a screenshot to show that the “validate button” is essential in finding the correct UI element from the Visual Tree. When you find the correct Element for the Find box, double click it and the details in the Selector pane will be updated (bottom right pane). Hit save. And that’s it!
Repeat these steps for the “Replace” box, and the “Replace all” button.