The 25.10 Community release is now available! ![]() This update introduces a refreshed Studio experience with an updated UI, compact design mode, support for Solutions , quality-of-life enhancements, and improved stability across Windows projects.
This update introduces a refreshed Studio experience with an updated UI, compact design mode, support for Solutions , quality-of-life enhancements, and improved stability across Windows projects.
Highlights:
- Studio UX improvements – Refreshed look with a new color theme, compact ribbon, cleaner dialogs and updated
- Compact mode for Windows and Cross Platform Sequence based projects – Easier navigation within
- Support for solutions - Open Solutions, see all its projects and resources, reuse existing Windows or Cross-Platform RPA projects, and seamlessly build, debug, and sync your work back to the cloud.
- Quality of life improvements - Switch tenants directly from Studio, search for Orchestrator folders and many more
- Improved reliability – Continued stability and performance updates.
New in this October release
Primary Actions in title bar
For a cleaner, more compact look, unpin the ribbon. This will bring all primary actions directly in the title bar, giving you more space for building or editing your workflow.
Autopilot Chat Panel
UiPath Studio now includes the Autopilot Chat Panel, helping you build and edit workflows directly through conversation. You can use it to generate activities, fix errors, and discover best practices — all without leaving your development environment. Autopilot Chat Panel currently works with Sequences and Coded Workflows.
Panel docking
We’ve made some changes to how the panels are docked in the designer:
- Tab placement changed – Instead of always appearing at the bottom, panel tabs now align with their orientation: vertical panels show tabs on the sides, and horizontal panels show them at the top when in view.
- Cleaner layout – The search bar isn’t shown all the time anymore; it now appears only when needed.
- Simplified controls – Extra panel options have been moved into an overflow (⋮) menu to reduce clutter.
- Show / Hide Panels - Customize your layout and display or hide specific areas to optimize screen space and focus on what’s relevant
Studio 25.10 Recap
Studio UX refresh
We’ve made a number of visual tweaks to elevate the overall experience. These changes focus on improving clarity, consistency and the design experience.
Here’s what’s new:
- New color theme
- Command palette in the title bar
- Ribbon layout now compact by default
- Cleaner dialog boxes
- Larger modal widgets
- Redesigned scroll bars
Expand each section below if you’d like a before and after view of some of the changes.


Scroll bars
Studio design experience for Sequence workflows
We’re excited to share a new design experience for sequence-based workflow projects. This more modern design experience aims to improve navigation and readability of workflows through line numbering and compact activity designers. Activity properties are visible directly within the canvas, allowing more space for building workflows.
This experience is available on all Cross Platform projects. For Windows projects, the functionality needs to be enabled. To do that, navigate backstage to Settings>Design and toggle the Compact Design Experience.
What’s New in the Designer?
Slim activity cards
Activity cards are now compact, helping you see more of your workflow at once—especially larger workflows.
The primary property is visible directly on the canvas, making the workflow more readable at a glance. You can configure all activity properties directly in the Properties Panel.
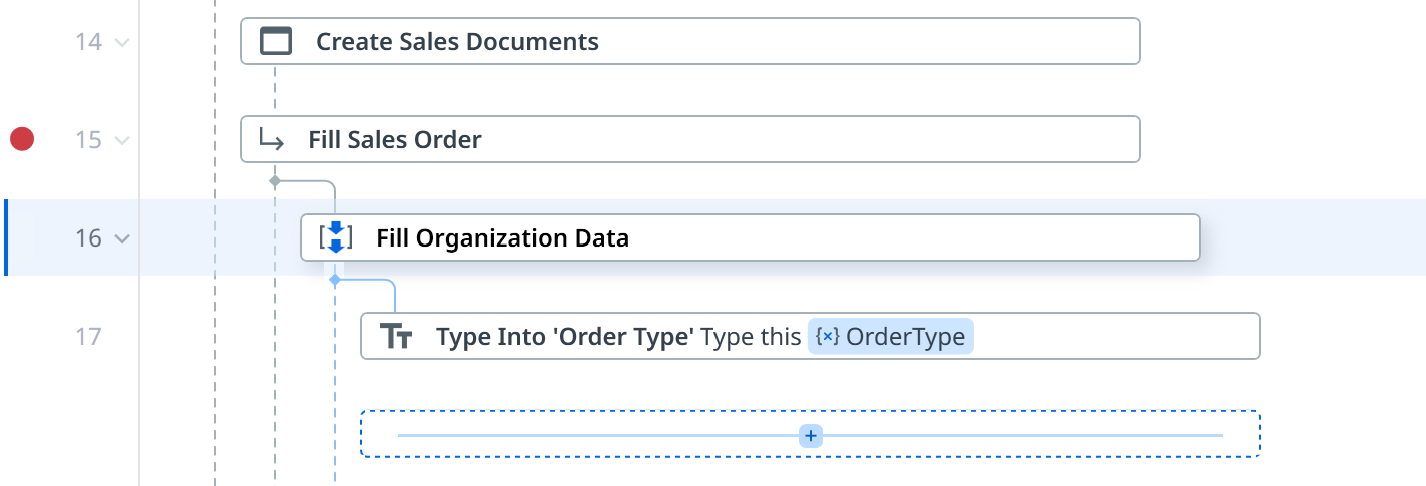
Line numbers
Each row now displays a line number, which is perfect for navigating, reviewing, and debugging with teammates.
- Add breakpoints directly from the line numbering
- Easily expand/collapse containers
- Highlight selections
Easy to add activities and cases
Adding activities or cases/catches is available on hover, reducing visual noise and unnecessary spacing.
Annotations
We’ve updated the visual style of annotations to align with the new design:
- when unpinned, annotations now feature rounded corners;
- on cross-platform projects, pinned annotations are part of the activity card.
Breadcrumbs
When working in large workflows with deep nesting, the breadcrumb path in the Designer header could quickly become hard to read. With the new look and feel, breadcrumbs now collapse into a dropdown once they exceed the available space.
This means you can:
- Quickly expand the dropdown to see the full path whenever needed.
- Avoid overflowing or truncated breadcrumbs in complex workflows.
Data Manager
The Data Manager has a new design, making it easier to create and manage variables and arguments through a tabular experience.
To create a variable, simply click on Create variable and configure the entries in the row. The video below, highlights how easy it is to use the keyboard in the new Data Manager.
To create a Global variable or a Constant, right click on the Data Manager to find these options. If a Row is selected, you’ll also get the options available for a Variable.

By default, variables in the Active Scope will be visible. To change that, navigate to the scope column and click on the button to view all variables:
You can also select multiple items to copy or delete them.
Solutions in Studio Desktop
Studio Desktop is now Solution-aware so you can leverage its powerful RPA design/debug capabilities while keeping everything in a Solution context. Open a Solution from Web, see all its projects and resources, and import/reuse your existing RPA projects (Windows or Cross-Platform) inside the Solution. Build and debug in Desktop, then sync to cloud to continue composing and deploying in Web.
Solutions are cloud-level containers for modeling an end-to-end automation as a single, versioned unit. In one Solution you can create and orchestrate:
- API Workflows
- Agents
- Agentic Processes
- Apps (with human-in-the-loop validations)
- RPA workflows
All components share Solution-scoped resources (assets, connections, queues, storage) that you manage centrally at the Solution level. Solutions are portable - package once and deploy across tenants and organizations with environment-specific configuration.
 Flow: Web ↔ Desktop
1. Create the Solution in Web
Add what you need: API Workflows, Agent, Agentic Process, etc.
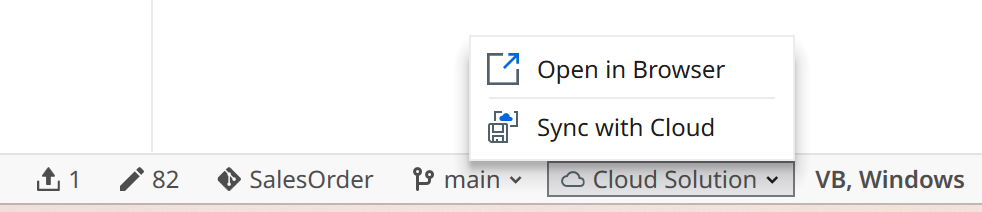
2. Open in Desktop
In Web, right-click Solution → Open in Desktop to launch the Solution view in Desktop (shows all projects & resources).

3. Import or create RPA projects
Bring in existing RPA or start new ones inside the Solution.

4. Put the whole Solution under Git
Manage commits/branches at Solution level.

5. Add resources from Orchestrator
Use the Activity Resource widget picker to add assets/queues/connections by selecting them from Orchestrator .


6. Design, debug, troubleshoot (RPA)
Everything works as before in Desktop.
7. Sync to Cloud & continue in Web
When you’re happy with Desktop changes, Sync to Cloud and keep building the agentic flow in Web.

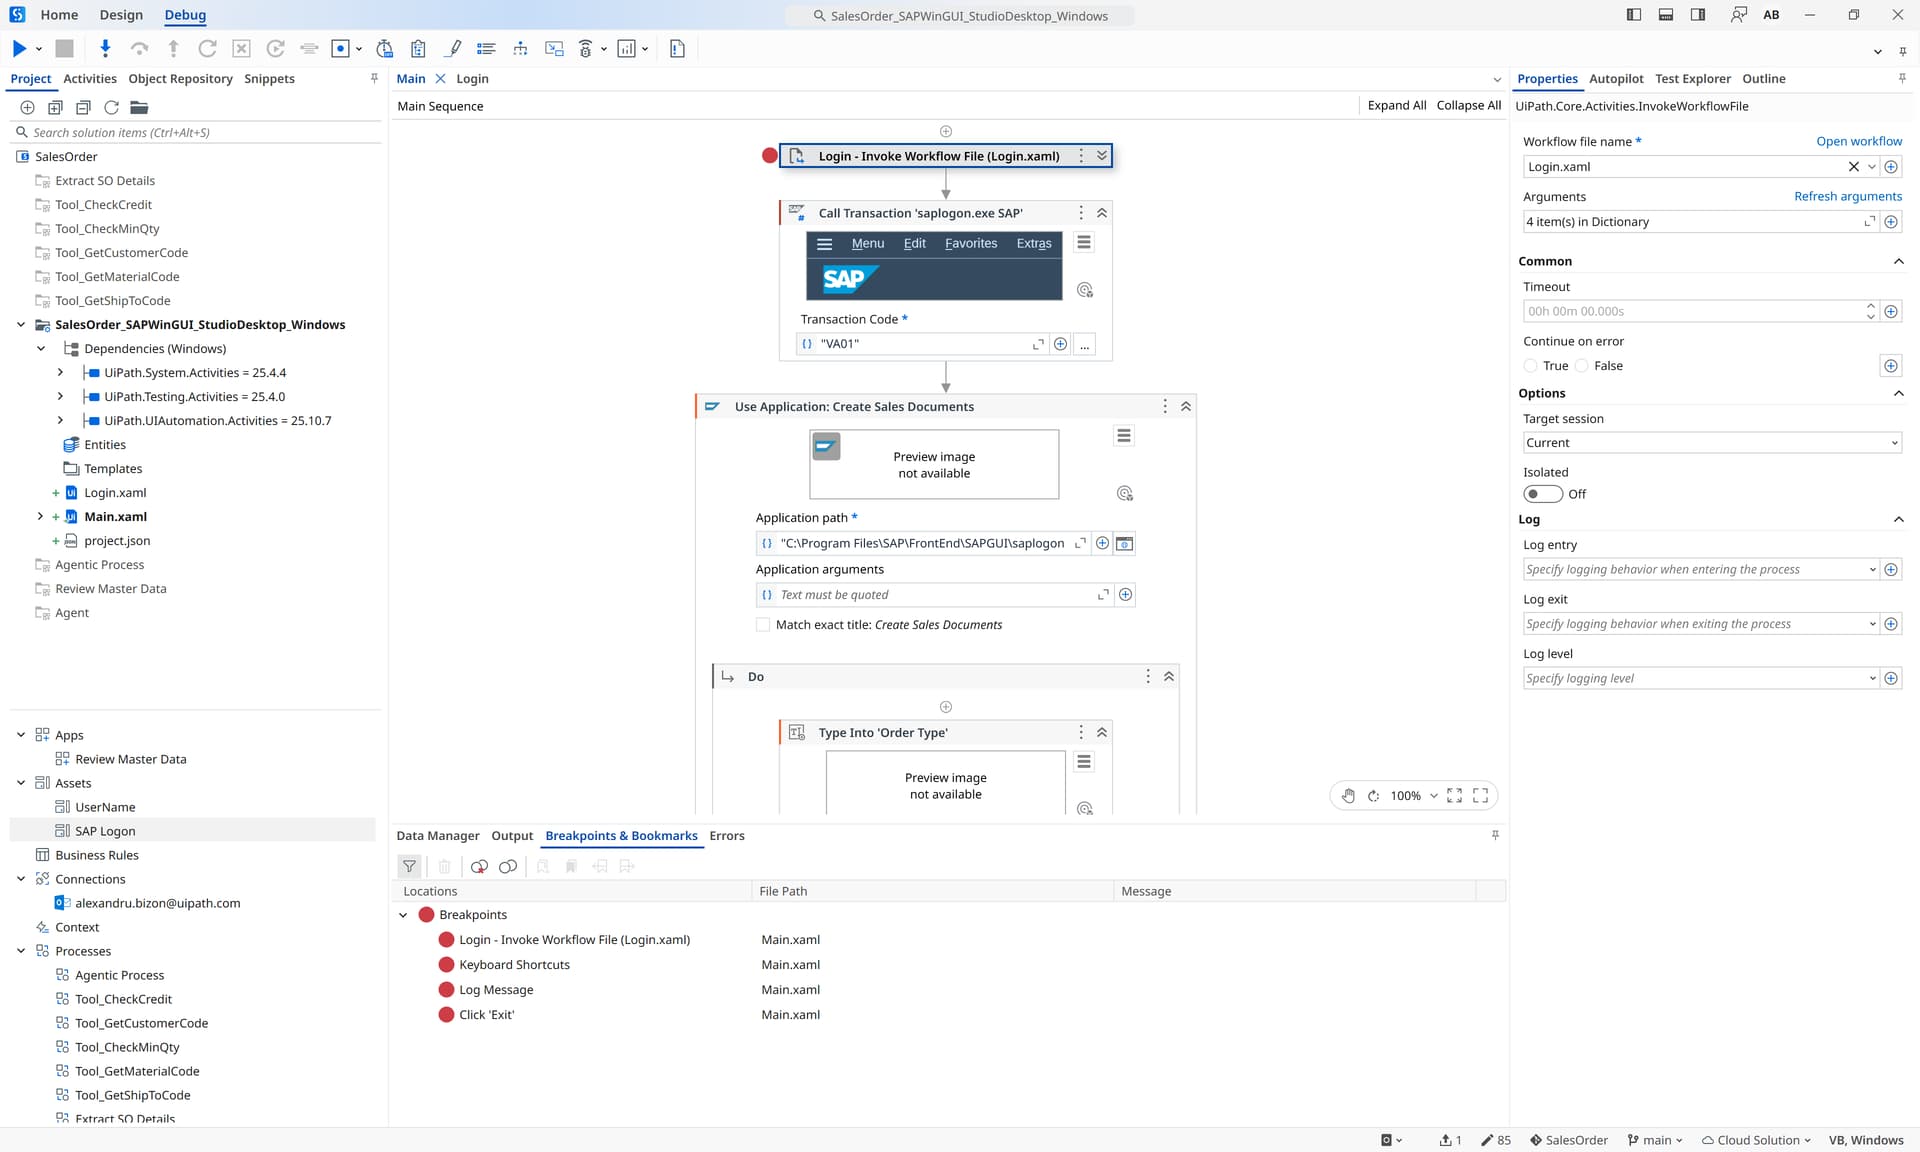
 Current limitations
- Renaming projects: Only in Web (not from Desktop).
- Editors: API Workflows, Agents, Apps, Agentic Processes are Web-only.
- Publish scope: From Desktop you publish only the current RPA project.
Solution packaging & deploy happen only in Web. CI/CD integrations via UiPath CLI will soon have Solutions support. - Solution lock (concurrency): Only one user can work on a Solution at a time. We introduced a Solution-level lock to prevent unsolvable conflicts (e.g., one person builds an API Workflow in Web while another edits an RPA project in Desktop). Without the lock, a later sync could cause one set of changes to be lost. This limitation will be removed soon once Web supports local workspace (saving the entire Solution to disk), enabling standard Git flows to safely resolve conflicts.
 Tips
Tips
- Use Git at the Solution level to version RPA + configuration together.
- Before opening in Desktop, deploy the Solution for debug from Web - you will have all solution resources and projects deployed in Orchestrator and ready to be consumed in Desktop.
![]()
![]() Questions or feedback about this Desktop ↔ Web loop? Drop them below!
Questions or feedback about this Desktop ↔ Web loop? Drop them below!
 Long Running Workflows
Introducing Long Running Workflow, a new canvas in Studio that uses BPMN concepts to help you model and automate advanced processes. Currently under preview, you can get started with the Long Running Automation template (make sure to Include prerelease) and build workflows that integrate tasks, decision points, data flows, systems integration and human collaboration all while leveraging UI, API & API-powered capabilities.
The Invoice Processing workflow below has been built using the Long Running Workflow canvas and uses concepts like User Tasks, Service Tasks, Gateways, Message Intermediate Catch Events and many more.

Learn more about it here:
Long Running Workflows Community Preview - News / Product News - UiPath Community Forum
Creating a Long Running Workflow file
To make it easier to get started, you can now create a Long Running Workflow file directly within any project. To do this, simply navigate to New, select Long Running Workflow and a new file will be created for you.
Long Running Automation template
The Long Running Automation template is now available as a built in template, replacing the Orchestration Process one. You can access it directly from Backstage, without navigating to the Templates page.
The activity package is called UiPath.FlowchartBuilder.Activities and just like before, you can create a Long Running Workflow from any Process by installing the package and creating a new Long Running Workflow. If you’ve created a Long Running Automation using the BusinessProcess package and you’d like to take advantage of the new functionality, you can install the FlowchartBuilder package and remove the dependency for BusinessProcess.
Detached Error Handler in Long Running Workflows
You can use a Detached Error Handler to manage exceptions occurring within the Long Running Workflow. Unlike the Error Boundary Event, which is usually tied to a specific Task, the Detached Error Handler provides a global exception handling inside the canvas. This is because it is tied to an Exception and not a Task.
The Detached Error Handler is useful as it allows you to define more steps in the error handling process. For example, in an order fulfillment process, any failure during payment, inventory check, or shipment steps could trigger a Detached Error Handler that notifies the customer, updates the order status, and logs the issue for support.
This approach is ideal when you want robust and reusable error management across the entire process, rather than handling errors piecemeal at individual activities.
In the example below, I’ve added a Detached Error Handler to handle all possible exceptions occurring in the process:
When an error was triggered, execution was moved to the Detached Error Handler where I had a recovery using an Agentic Task:
You can add multiple Detached Error Handlers, as long as they handle different exceptions.
Error Boundary Event vs Detached Error Handler
| Error Boundary Event | Detached Error Handler |
|---|---|
| Use it when you want to catch an error for a single specific Task | Use it when you need to handle errors globally within the process |
| The error handling logic is simple and tied directly to one Task | You want to reuse the same error handling logic for multiple Tasks. The error handling is more complex and can involve multiple steps. |
| Example: An Error Boundary Event on a Send Invoice task catches a failure and routes the process to retry or notify the finance team and continue execution | Example: Any error thrown in a customer onboarding process triggers the Detached Error Handler that logs the error, sends an alert, and rolls back some changes. |
You can have both an Error Boundary Event and a Detached Error Handler on the canvas, handling the same exception:
-
if the exception is thrown on Task A, the execution will move on the Error Boundary Event path and go through Recovery Task A and Task B
-
if the exception is thrown on Task B, the execution will move towards the Detached Error Handler and recover it there


Agentic Task
You can now use Agentic Task to invoke Agents as well as RPA processes. The Agentic Task leverages the Run Job activity which allows you to select between RPA and Agent processes. With this change, the activity can now be equivalent to the Call Activity from BPMN.
Import BPMN
For cases where you’d like to import your existing BPMN file within your project, you now have a new entry point. Right click on the Project Panel, select Import File and select the .bpmn option. Once you select your file, it will create a new Long Running Workflow containing the model imported in the file. This will model the BPMN file using the activities available in the Long Running Workflow, allowing you to speed up development and better collaborate with process owners.
Annotations
You are able to pin annotations to the canvas. From the Context Menu, add an Annotation (or use the shortcut Shift + F2) which will pin it to the canvas. Some of the functionality available:
- unpin it using the button
- resize the annotation using the
- annotations move separately from the activities
 StudioX capabilities into Studio
You can now create a StudioX Task directly from Studio without having to switch profiles. Simply navigate to the Templates and search for the Task which will enable you to create a StudioX workflow. You can take advantage of Project Notebook and other StudioX capabilities. With this change, you can also consume StudioX templates.
Studio for Citizen Developers
StudioX becomes Studio for Citizen Developers. While the name may be slightly different, it’s the same platform that helps Citizen Developers automate their applications.
You can continue working on your existing projects or create new ones just like before, as the experience remains unchanged.
Improvements
Performance improvements
Working with large projects? Studio’s now faster and more responsive where it matters most.
-
Workflow Designer: Up to 10x Faster Navigation
Large workflows scroll and render much faster now.
-
Manage Packages Search: From minutes to seconds
We drastically reduced search time when browsing “All Nodes” - this used to take minutes when having multiple feeds configured and searching for broad terms. -
Compile Expressions to Single Assembly
Reduces compile time by ~30%. A backend change you’ll feel in faster execution. -
Faster Locals Panel
Expanding JIT-compiled objects used to take up to 10 seconds — now it’s instant for most objects. In the next release, we’ll improve this further by adding full support for nullable types, so even those edge cases expand instantly.
Switch Tenants Without Leaving Studio
You can now switch tenants directly from Studio. Whether you’re juggling multiple environments or managing several clients, switching is just a click away.

Search in Orchestrator folders
You can now search for Orchestrator folders when viewing the list in the status bar. The same functionality is available for Git branches.
Git – bring changes to a new branch
Until now, Studio users have often been blocked when switching branches. Unlike Git clients, Studio doesn’t support stash. Additionally, projects sometimes became “dirty” simply by being opened in a new Studio version (Designer auto-updates), which forced a commit on main before switching branches.
To solve this, we’re introducing a “Bring changes to a new branch” action. If you’ve made edits (or Studio has marked the project as changed) and you try to switch branches, you’ll be able to move those pending changes to a newly created branch automatically.
Word wrap in Expression Editor
The Word Wrap functionality in the Expression Editor ensures that long expressions automatically wrap to the next line instead of extending beyond the visible area. This should make it easier to view and edit complex expressions without horizontal scrolling.
By default, the functionality is Enabled but you can disable it by clicking on the icon.
Browse Integration Service Connectors Directly in Studio
You can now browse Integration Service Connectors directly from the Manage Packages window in Studio, making it easier to discover and integrate with third-party applications.
- A new All Connectors tab is available, allowing you to explore and install connectors like Salesforce, ServiceNow, and Microsoft 365 without leaving Studio.
- Once installed, the connector activities appear in the Activities panel under Installed, making integration just a drag-and-drop away.
Try it out and let us know how it improves your workflow! ![]()

Automatically import namespace for dynamic variables
Studio now automatically imports the namespace of any type generated at runtime by an activity (e.g., Run Job with Agent input/output).
This lets you use the type immediately in expressions without manually managing Imports and reduces setup friction when working with dynamic types.


New Tools to Keep Your Git Projects Clean
First, when you initialize a Git repository directly from Studio, we now auto-generate a .gitignore file that excludes local cache folders. This prevents accidental commits of environment-specific or machine-specific data, which can cause problems for teammates or CI/CD pipelines. The Studio-generated .gitignore helps enforce best practices by default—especially helpful when using external Git tools that don’t filter these folders automatically.
Second, we introduced a Remove Project Cache action under Remove Unused to fix strange behavior that sometimes occurs after cloning a project or switching Studio versions. This feature deletes the project’s cache folders and forces a clean recompile of all activities and dependencies. Use it when activities appear missing, validations fail, or runtime errors like TargetInvocationException occur. It’s a quick way to recover from broken states caused by mismatched cache artifacts—particularly useful after a Git pull, machine switch, or rollback to an older project version.

Find References Panel
You can now resize columns in the Find References panel, allowing you to view longer paths or display names. Not only that, but it fully supports Coded Workflows. This makes it easier to navigate and understand dependencies no matter what flavor of automation you’re working with.

Feedback form
You can now share your email address with us in the Feedback form. This will allow us to reach out in case we need more details to help us troubleshoot (logs, setup) or any additional information regarding your feedback.
Continuous improvements
-
Output Panel v2
Context-aware logs. Persistent compile output. Full-text search.
-
Auto-Scope for Modern Activities
For activities that require a parent container (or a scope), Studio will automatically add it on the canvas when it’s not present. -
Generate Variables from JSON Schemas
Paste a JSON schema and instantly create a strongly typed variable. It’s now easier to create, maintain, and work with structured data — especially when interacting with APIs, complex objects, or Agents.
This initial version supports first-level properties, with nested structures coming soon in a future update.
-
Default Zoom Settings
Studio now remembers your preferred zoom. Navigate Backstage and configure it in the Settings.