Hi Forum Community,
In this topic, I will show you how to add interactive HTML buttons to the mail and modify it as desired. In addition, after the person clicks the button, it will automatically create a draft reply mail and we just have to press the send button. It may seem like it doesn’t have much use, but in processes that require approval from business units (especially in invoice processes), it will reduce the error rate to zero thanks to the ready-made mail content. After receiving the approval from the customer, the process can stand up and perform the invoice registration process. Below I am sharing the content format we need to put in MailBody.
<table width='100%' cellspacing='0' cellpadding='0'>
   To whom it may concern,<br><br>
   I am waiting for your approval for the invoice whose information I have shared below.<br>
   Document Date : {0}<br>ObjKey : {1} <br > is the invoice eligible for approval?<br><br>
  <tr>
      <td>
          <table cellspacing='0' cellpadding='0'>
              <tr>
                  <td style='border-radius: 2px;' bgcolor='#81FC26'>
                      <a href="mailto:omer.ozturk@nativebs.com?subject={1} {2} Approval &body=$Approved,Document Date : {0}, ObjKey : {1}, Document Type: {2}
			$"target='_blank' style='padding: 8px 12px; border: 1px solid #ED2939;border-radius: 2px;font-family: Helvetica, Arial, sans-serif;font-size: 14px;
			color: #ffffff;text-decoration: none;font-weight:bold;display: inline-block;'>Approve</a>
                  </td>
                  <td style='border-radius: 2px;' bgcolor='#FC4C26'>
                      <a href="mailto:omer.ozturk@nativebs.com?subject={1} {2} Denial &body=$Denied,Document Date : {0}, ObjKey : {1}, Document Type : {2}
			$"target='_blank' style='padding: 8px 12px; border: 1px solid #ED2939;border-radius: 2px;font-family: Helvetica, Arial, sans-serif;font-size: 14px;
			color: #ffffff;text-decoration: none;font-weight:bold;display: inline-block;'>Deny</a>
                  </td>
              </tr>
          </table>
      </td>
  </tr>
</table><br><br>
  Please provide feedback so that I can take necessary actions for the invoice.<br><br>
  UiPath Robot<br><p>
First of all, I would like to talk about how you can edit the above mail body.
Before , it is the body part of the e-mail that will be sent to the person concerned. The parts we will look at below are the information of the automatic reply mail.
After that HTML button’s visual configurations. The most important part in this sample is, after href part. This section enables the automatic reply draft body. Some parameters in here:
mailto: The part where the people who will be in the to section in the automatic reply mail.
subject= The part what will be the subject of the automatic reply mail.
&body= The part what will be the body of the automatic reply mail.
I can briefly summarize it this way, I think that those who want to try can easily adapt to the process.
**After the explanations, now I will show how it can be integrated into the process and how the process works.**
- First we need to read this text file with Read Text File activity.
Read Text File - Visual

-
Then get the output from read text file as a variable. My variable name is strMailBody.
-
After that we need to modify mail body variable. HTML body text has {0}, {1} and {2}. You can increase the number of variables but in this case we will use 3 values. So we use assign to format variable.
- Now our mail body is ready. In this example, i used Send Outlook Mail activiy. You can use different send mail activities. Properties of the mail activity shown below.
- Now, we can run the process and see the mail. Mail format is shown below.
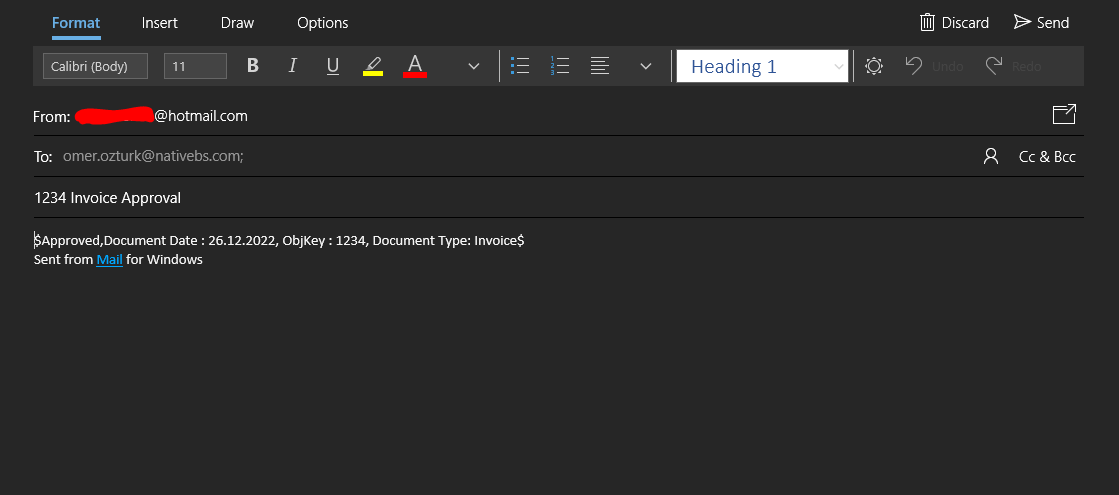
- We have two options in here. When we click the approve or deny button, this draft mail opens. No change needed. Only need to click Send button.
- After that, the reply mail arrives the robot. (In this case, it is my work account)
Thanks to this setup, you can easily send e-mails with interactable buttons, and receive automatic e-mails in a regular way.
You can use the ![]() button to make an evaluation or ask a question. Thanks in advance.
button to make an evaluation or ask a question. Thanks in advance.
Regards
Ömer


