How to integrate UiPath Automation Cloud with Nintex K2?
What is Nintex K2?
K2 allows to build and run applications and solutions that automate and streamline the organization's processes and operations. The tools and features available in the K2 platform also enable to maintain, monitor, and improve your operations. With the K2 platform, you can create complex, integrated, mission-critical process automation at scale, all the way down to quickly rolling out lightweight departmental workflows and simple applications. The platform includes tools and features that help you create, use, report and administer K2 applications.
Integrate K2 with UiPath Automation Cloud
The integration allows for both inbound and outbound communication that lets you make calls from K2 (via SmartObjects) to start processes in UiPath and make calls from UiPath to interact with K2 forms and workflows.
Requirements and Pre-requisites:
Requirements include:
- K2 Cloud,
- or
- K2 Five (5.2) or later with TLS 1.2 enabled. For more information about TLS 1.2, see K2 and TLS 1.2 Support.
- UiPath Automation Cloud API Swagger definition.
- UiPath Orchestrator Cloud tenant.
Prerequisites include:
- K2 Administrator privileges to configure a new service instance and OAuth resource.
- A familiarity with UiPath Orchestrator and Studio.
- Dedicated Orchestrator account for use with K2.
In addition to the above requirements, a basic understanding of REST-based web services, OAuth, and Swagger (OpenAPI) is required.
Setting up Nintex K2 to handle UiPath's API Requirements
Set up User authorization and Client Credential authorization with Nintex K2 out-of-the-box for UiPath Cloud. The Client Credential auth requires to use the Nintex K2 Client Credential extension. UiPath Cloud allows to create either Confidential or Non-confidential external applications. Confidential apps provides with a client secret that Nintex K2 can store securely. Therefore, Nintex K2 only integrates with confidential external apps, using OAuth tokens for authentication and SmartObjects for interaction. Nintex K2 does not cater for non-confidential UiPath apps.
On the Nintex K2 side, it is possible to set up a User auth type integration for specific UiPath users. These users need to sign in with their credentials to use the SmartObjects to interact with UiPath. Or you can set up the Client Credential auth type integration where anyone using the generated Nintex K2 SmartObjects has access to UiPath without needing permissions to UiPath itself.
When a UiPath OAuth resource type is created in Nintex K2, use specific parameters which the UiPath API requires. The details are in the steps below.
Step 1: In UiPath, register an external application.
Register an external application in UiPath to delegate authorization to Nintex K2 using the OAuth framework. See the UiPath documentation for Authorizing external applications.
When the external application is registered in UiPath, configure the following:
- Select the Confidential application type
- Select the Orchestrator API Access resource
- If planning on creating an OAuth resource for both User auth and Client Credentials, set the User Scope and Application Scope of the Orchestrator API Access resource to whichever scopes you need to access from K2. For example: OR.Folders OR.Users
- Otherwise set only User Scope for user auth or Application Scope for Client Credential auth.
- Set the Redirect URI to: HTTPS://{your K2 server}/identity/token/oauth/2
For the K2 configuration, the following information is required from the application in UiPath:
- App ID (also called the client ID in K2)
- App secret (also called the client secret in K2. The app secret is only shown once, in a pop-up dialog, when the app is registered. If not noted down, it is required to edit the app and generate a new one, then update your OAuth resource in Nintex K2.)
- App scopes (OR.Folders OR.Users)
Step 2: Create an OAuth Resource Type in K2
Use this step to add a new OAuth resource type. Create either a Client Credentials OAuth resource, or a User auth resource type.
The following information is required when setting up the OAuth resource in K2:
- The Authorization Endpoint: https://cloud.uipath.com/identity_/connect/authorize
- The Token Endpoint: https://cloud.uipath.com/identity_/connect/token
- The UiPath Swagger descriptor URL: https://cloud.uipath.com/{your organization}/{your tenant}/orchestrator_/swagger/{version}/swagger.json
- Specific property names for the OAuth resource, which you'll see in the steps below.
Create a Client Credentials OAuth resource:
Use below for the Client Credentials grant type, the request is for application scope
- Open K2 Management and navigate to Authentication > OAuth > Resource Types.
- Click New
- Specify the following information for the new resource type:
- Name: UiPathClient
- (Note: this can be anything but should identify the resource as UiPath client credentials)
- Description: A resource type for UIPath using client credential auth.
- Extension: SourceCode.Security.OAuth.Extensions.ClientCredentials
- (Note: this value is case-sensitive)
- Refresh Token Expiration: 0
- Expiration Warning Days: 0
- Invalid Message Delay Minutes: 0
- Usage: Authorization
The new resource type looks similar to the following:

- Click OK to save your changes and note the new type on the Resource Types list.
Create a User OAuth resource
Use this for the Authorization Code grant type, the request is for user scope.
- Open K2 Management and navigate to Authentication > OAuth > Resource Types
- Click New
- Specify the following information for the new resource type:
- Name: UiPathUser
- (Note: this can be anything but should identify the resource as UiPath user auth)
- Description: A resource type for UIPath using user auth.
- Leave the Extension field empty
- Refresh Token Expiration: 0
- Expiration Warning Days: 0
- Invalid Message Delay Minutes: 0
- Usage: Authorization
The new resource type looks similar to the following:

Step 3: Add Resource Type Parameters
Add parameters to the UiPath resource type. These parameters are specific to and required by UiPath.
- Resource type parameters for Client Credentials UiPath resource
- Resource type parameters for User UiPath resource
Resource type parameters for Client Credentials UiPath resource
- Select the UiPathClient resource type to open the Resource Type Parameters section
- Click New from the toolbar and add the following parameters:
- client_secret
- grant_type
- client_id
- scope
- For each parameter check the Token Request option
- For only the grant_type parameter, enter client_credentials in the Token Default Value field
- Then click OK.
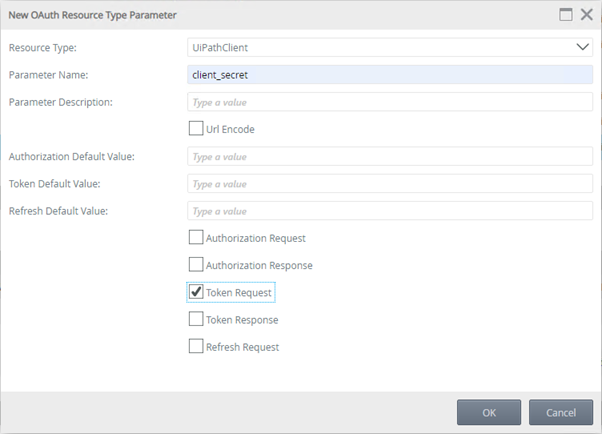
The parameters look like the following:

Resource type parameters for User UiPath resource
- Select the UiPathUser resource type to open the Resource Type Parameters section
- Click New from the toolbar and add the following parameters with the relevant checkboxes checked:
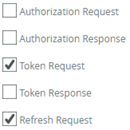
The parameters look like the following:

Step 4: Create and configure an OAuth Resource
OAuth resources are instances of an OAuth resource type and contain configuration values to provide authorization tokens for a system. For example, if two UiPath tenancies are present, it is required to create two OAuth resources based on the type created in step 2.
OAuth Resource for Client Credentials UiPath resource
- In K2 Management navigate to Authentication > OAuth > Resources and click New under the Resources section at the top of the right-hand pane
- Give the resource a name, such as UiPath-ClientCreds, select UiPathClient (from step 2) as the type, and specify the OAuth token endpoint for UiPath Cloud: https://cloud.uipath.com/identity_/connect/token

- Click OK
- Select the new resource and configure its parameters by selecting one and clicking Edit
- Specify a Token Value for each of the parameters, client_id, client_secret, grant_type, and scope. The token values are those noted when creating the external app in UiPath.
The page looks similar to the following and K2 is configured to communicate with UiPath Cloud using client credentials.

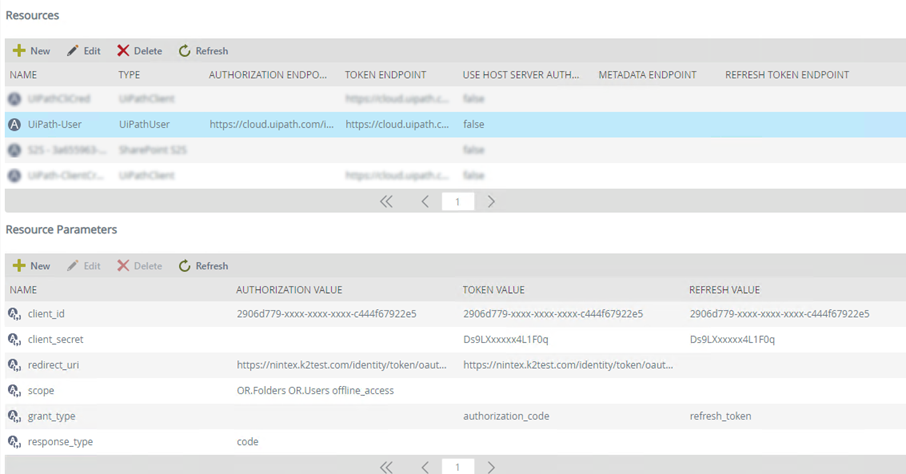
OAuth Resource for User UiPath resource
- In K2 Management navigate to Authentication > OAuth > Resources and click New under the Resources section at the top of the right-hand pane
- Give the resource a name, such as UiPath-User, select UiPathUser (from step 2) as the type, and specify the OAuth authorization and token endpoints for UiPath Cloud:
- Authorization Endpoint: https://cloud.uipath.com/identity_/connect/authorize
- Token Endpoint: https://cloud.uipath.com/identity_/connect/token

- Click OK
- Select the new resource and configure its parameters by selecting one and clicking Edit
- Specify Authorization, Token Value, and Refresh values for each of the parameters using the table and image below as guidance. The values are those that you noted when creating the external app in UiPath.
Add a space and offline_access after your scopes for the refresh token to work. The page should look similar to the following:
Nintex K2 is now configured to communicate with UiPath Cloud.